The first thing I did is create a project plan to help keep me organized while trying to decide what needs to be done next. Not exciting, but I think it will help prevent putting sub-assemblies together only to find that I have to take it apart again to complete another step.
Next, I decided that I am probably not going to be able to build the hoop for the rear sub-frame with the tools and skills I currently possess, and I have completely struck out at finding someone locally who can do it for me. Dime City Cycles sells a completed hoop as well as an entire rail, but...$$$. They look like quality parts and I don't mean to knock the guys at DCC -- they are true craftsmen, in every sense of the word. However, I just can't see spending $70 on a single curved piece of steel tubing, nor can I afford $249 for the entire seat rail. Consequently, I took an extra piece of 7/8 inch tubing and used a 1 inch hole saw in my drill press to cut the ends to fit the sub-frame rails on the bike. By careful measuring -- and a lot of luck -- I managed to get it almost exactly the right width between the rails. Now, I need to buy some oxygen and acetylene from the local welding supply store so I can fire up my torch (which I've owned since nineteen-ninety-something and have never, ever used) to weld the cross-brace in place. Either that, or I can buy an arc welder from Lowe's or Home Depot, since that should be about the same amount of money as the welding gas, and is (arguably) better for welding steel tubing.
On top of that, I have revisited the fiberglass side covers I started making back in December. The surfaces were not nearly as smooth as I envisioned, so I spent a couple of hours with some 80-grit sandpaper, grinding down the high spots. Of course, as often happens when working with fiberglass, the tops of some of the low spots were lower than the bottom of some of the high spots, lol, so I ended up sanding all the way through the glass in places. That's okay, though -- these are not load-bearing parts, so discontinuity in the glass is acceptable, in this case. After getting the parts reasonably smooth, I cut another layer of glass, laid it over the parts, and wet it out thoroughly with more resin. I then used a cheap paint brush to work the resin into the weave, making sure there were no voids or air pockets (or at least trying to, anyway...), and let the resin cure. The corners are proving to be a bit tricky, so I ended up mixing up another batch of resin, shredding some scraps of glass cloth into the resin, and stirring to make a thick, sticky, goopy mess, which I applied liberally to the inside of the corners to stiffen them up and fill in the voids. Some time in the next week, I'll be sanding the high points where the glass creased instead of conforming to the intended curvature of the corners. It'll probably take a little more resin inside the corners, and maybe another ply or two of patches over the corners, as well as a lot of TLC with the sandpaper, before the corners are good enough for me to call them done :) After that, I'll prime and paint the covers to match what I intend for the rest of the bike. I'm thinking Duplicolor stainless steel with a coat or two of blackout shadow paint I have for the tanks...should look killer with the black frame, engine and handlebars!
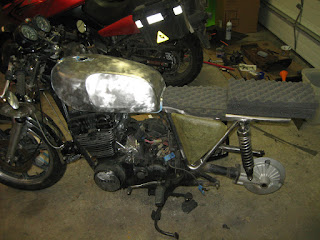
Last, I finallydecided to stop procrastinating on the seat pan. I'm still concerned about putting a fiberglass seat pan over the battery, considering some of the stories I've read concerning charging problems on older motorcycles. Fiberglass can burn, steel doesn't. Consequently, I bought a sheet of mild steel from Lowe's, cut to approximately the same size as the seat rails on my bike, and started hitting it with a hammer until it looked about right. No, really -- that's exactly how I did it :) I laid the steel over the existing sub-frame, marked an outline with a Sharpie, redrew the outline about 1 inch wider, cut the marked line with my angle grinder, and beat it to conform to the shape of the sub frame. All things considered, I'm very, very happy with how it is turning out.

Once I was pretty happy with the shape of the seat pan, I started laying out and cutting foam for the seat padding. A little spray adhesive to hold the various pieces together, and it was starting to look pretty good:

I still need to take a file to the seat pan and smooth out all of the rough edges. The cut-outs for the shocks and other miscellaneous frame protrusions are pretty rough, and will develop stress cracks if I don't clean them up a bit. Then, I'll need to drill the pan for the lacing to sew the vinyl in place. I'm concerned that the sharp edges in the steel pan will abrade any kind of textile thread -- even kevlar, if I could find it -- so I think I will probably end up lacing the vinyl down with steel wire, then covering that with some rubber trim, glued in place. <shrug> I'll figure something out :)
No comments:
Post a Comment