Despite my prep work last time, I am not ready to start building the fiberglass seat pan. I need to fabricate a steel hoop to tie the two halves of the rear of the frame together. Unfortunately, Lowe's had 1/2 inch diameter steel tube, and they had 3/4 inch solid round steel, but they did not have any 3/4 inch diameter steel tube. Consequently, I'll probably pay a visit to some of the airplane shops at Merrill Field some time this week to see if I can round up some 3/4 inch 4130 chrome-moly. How sweet would it be to build the whole frame from 4130? Unfortunately, that's just a bit (a lot...) beyond my skill level :) Consequently, I decided to get started on the side panels to cover the electronic/battery bay.
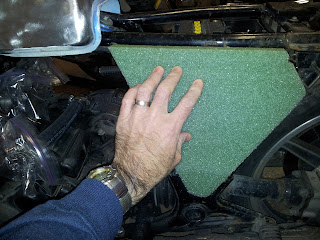
I started with a small sheet of foam that I purchased at Michael's, in the floral section. I cut it to roughly the same size as the opening that I wanted to cover.
Next, I marked the backside of the foam to match the inside of the tubing on the frame and cut the foam to fit between the tubes.
Cut, sand, fit, and repeat...
...until it fits. Well, at least when directly from the side. Unfortunately, the frame is not straight. It's curved at the top, and therefore, there is a gap between the foam and the frame. No problem -- one of the nice things about building fiberglass parts from foam molds is that if you screw up, or if a part doesn't quite fit, just glue a piece of foam to your work in progress, then cut and sand until it looks like you want it to. Unfortunately, the $10(!) Elmer's spray adhesive I bought...well, it sucks. Supposedly, it can take up to an hour to dry (grrr!), so we'll see if the left-hand panel is a single piece tomorrow, or if I need some different glue.
While the glue was drying on the left-hand panel's foam plug, I got started on the right-hand panel. There is one snag, however, that makes the right-hand panel a little more difficult than the left. If you look right in the middle of the triangle, you'll see a thick, black wire with a heavy rubber boot covering the end. If I am not mistaken, that's either the starter solenoid or the master battery contactor.
In either case, it sticks out far enough that the foam plug has to be carved out to clear the boot, so I marked the approximate size of the contactor, dug out a piece of 60-grit sandpaper and started recessing the foam.
Unfortunately, at this point, after test fitting the foam, I dropped the foam plug and broke off a corner. Okay, no problem -- as we've already mentioned, you can simply glue pieces back on if you make a mistake. The fiberglass needs to be smooth, presentable, and attractive, but the foam plugs can be a hodgepodge of glued together pieces, so long as you can sand them smooth before starting your lay-ups. However, as I mentioned up above, the spray adhesive I bought doesn't stick very well, or at least doesn't provide much initial tackiness. So, I glued the pieces back together and set them on my work table to dry.
To be continued...


No comments:
Post a Comment