Wednesday, May 25, 2011

2011 Ride for Hope!

Motorcyling can be a somewhat selfish pleasure, especially if, like me, you spend most of your time riding alone.  However, after reading Irresistible Revolution a few years ago, I decided I really wanted to start living a life that is less about me and more about others.  So, I was thrilled the other day when I saw a poster for a fundraising ride for Crisis Pregnancy Center and Heart to Heart Pregnancy Resource Center, two local organizations that are "dedicated to providing accurate information, services, and support to individuals to help them make informed, life-affirming decisions about pregnancy, sexual integrity, parenting and post-abortion recovery."  I sent an e-mail to one of the organizers asking for more information, and just like that, I'm in.  Saturday, June 25th, I'll be joining a group of motorcyclists for the 2011 Ride for Hope!


View Directions to Hope, AK in a larger map

The route to Hope cuts through some of the most beautiful scenery in this corner of the world, and using my motorcycle as a tool to help raise money to help support these two organizations is a good way for me to begin living for others. My goal is to raise $500 in pledges.  So...if you would like to sponsor me (please!!!), add a comment below.  If you can help, I'd be very grateful :)  Or if you ride too, go to CPC's "events" page, fill out a registration form and join us on the ride!


Sunday, May 1, 2011

A Different Ride Report

This past Friday, I took a group ride with several close friends.  This trip was a little different for me for a couple of reasons.  First, I almost always ride alone.  I'm not anti-social; I just never seem to hook up with others to ride together, except for maybe once or twice with my wife, and once when I was following a group of riders home from Wasilla at about 11:00 at night (we were worried about moose on the highway, and the lead vehicle was a van, lol).  Second, I didn't take the V-Strom...I took my mountain bike, a Diamondback Outlook that I've had for five years or so, and that has been seriously neglected since buying the Suzuki :)

Anyway, Friday morning, five of us packed up our gear and bikes, piled into two trucks, and departed Anchorage for Eklutna Lake, destination: Serenity Falls, roughly thirteen miles around to the far side of the lake.

The view towards the far side of the
lake, from about a mile in.
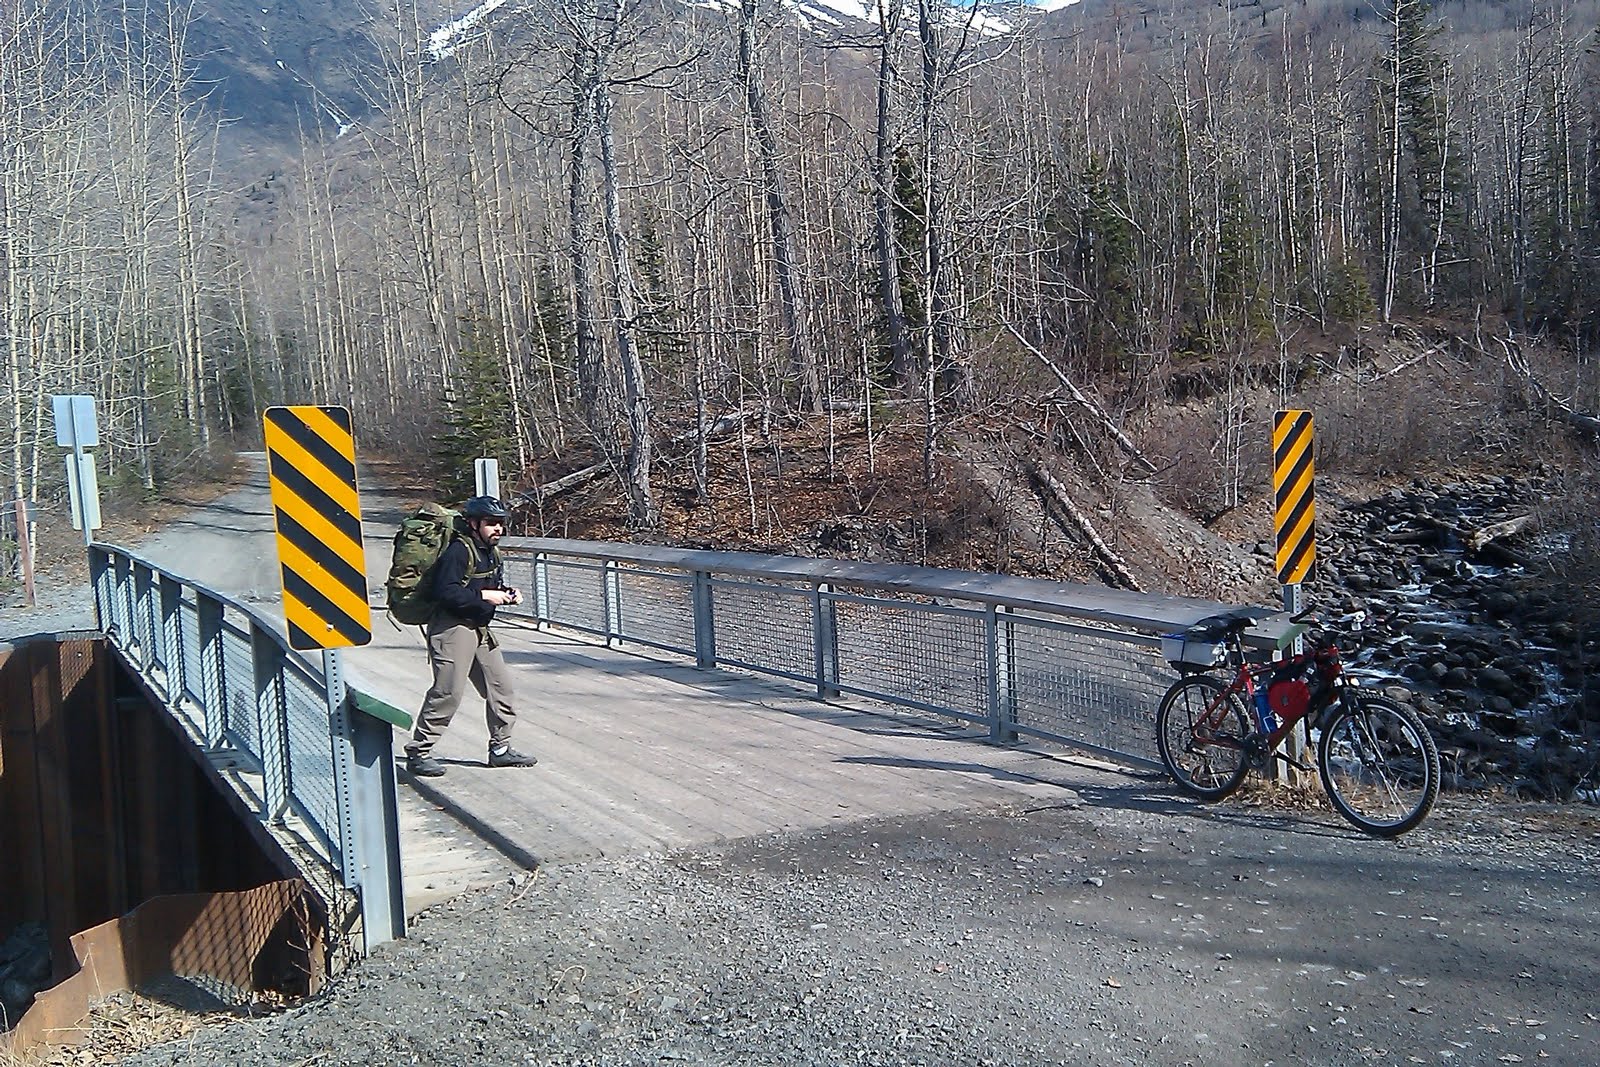
I had packed lightly, since this was only an overnight trip, and I had just cleaned and lubed the bike the previous weekend, so despite the fact that two of the five of us were about half my age :) the first mile passed easily enough. However, by mile five  I was starting to feel my lack of recent exercise.  Fortunately, we stopped for a breather at a bridge over one of several small creeks that feed into the lake.

Eric snaps a few photos with his iPhone while I'm doing
the same with my Android
And Pat catches up with us for a breather at the bridge
While all of us pulled ahead from time to time, or dropped to the end of the group as we shed layers, grabbed a snack, etc., I was keeping pretty much in the middle of the group most of the time.  Nevertheless, Nate, one of the two twenty-somethings (well, technically Joel is a couple of weeks shy of being a twenty-something) was doing his best to remind me that my twenties were more than just a few years ago :)  He was absolutely a machine, pulling ahead of the rest of us, whether we were going uphill or down, and staying in the lead more often than not.


Shortly after resting at the bridge, we ran into one of the toughest spots of the ride: about a half mile of snow-covered trail.  Yes, Virginia, it's April 29th, and yes, that's still a lot of snow on the ground.  At one point, the snow and ice pack had cracked open like a crevasse on a glacier.  No joke, the crevasse had to be at least three feet deep!  Several of us, myself included, tried to bike across the snow.  I've done it before, but not with a day pack filled with over three quarts of water, a sleeping bag, a Coleman stove and food.  All of us were just a bit too top heavy to balance our bikes on the soft, slush-over-ice snowpack, and we ended up walking most of the way.  I think three of us -- maybe all of us -- bought it at least once trying to ride across the snow.  Obviously, I was the slowest learner, because I must have dropped my bike on the snow three or four times as the front tire tried to go one way, the rear tire tried to go another, and I tried to keep going straight.

Bold Airstrip is located at mile eight, on the far shore of the lake.  Next to the airstrip is a small cabin that you can rent from the state park, and by the time we got that far, I was ready to drop my gear there and call it good.  Lucky for me, however, Eric dug out his GPS and spent fifteen or twenty minutes searching for a geocache, which he found, so I got a chance to snarf down another Cliff Bar and recuperate for the final four mile ride.  By the time I got back to my bike, Nate and Eric were already tiny dots on the trail, so I resumed by usual position in the middle of the pack, with Pat and Joel right on my heels.

Other than the ice pack just before reaching Bold Airstrip, most of the preceding eight miles had been pretty easy riding, with slight up- and down-hill sections surrounded by alpine forest.  Spring in Alaska is my favorite time of year, with the promise of an entire summer stretching out before you.  Everywhere you look, snow is melting, the grass is beginning to green and the trees began popping out buds as the sun begins to invite life back into the world.  Best of all, the air is filled with a clean, soapy smell from the tree buds on the alders, willows and cottonwoods that share the woodlands with spruce and larch trees.  At the airstrip, however, things changed, as the forest had apparently been ravaged by fire some time in the fairly recent past.  Blackened husks of trees stood out against the green mountains on each side of the valley, looking like charred skeletons with their empty branches clawing at the sky.  Yet even here, life was returning, claiming its stake on the fire-scarred forest.  Already there were small willow and alder saplings, and  I'd wager that soon mature willows and alders will obscure all evidence of the fire.

The view from the bridge...

...and the view OF the bridge.  That's Pat
in the blue sweatshirt and white cap,
Eric next to him and Pat's son Joel on
the opposite side of the bridge.
Near mile ten, we stopped to search for another geocache at yet another bridge spanning a happily bubbling creek.  All of us were tired and sore by this point, and we were grateful to drop our packs and lean over the bridge railing to watch the water go by.  We knew there were only another two miles to go, so eventually we picked up the packs again, hobbled back on the mountain bikes and started the final push to the Serenity Falls cabin.  I mentioned to Pat that I was really missing my V-Strom at this point.  "It wouldn't be worth doing if it was easy," he laughed.  Yep, I can't argue with that.

Since Bold Airstrip, the trail had grown more and more rocky.  It was still plenty wide enough for a car to drive, but whereas the lakeside trail was a smooth, packed gravel trail, the stretch between Bold and Serenity Falls was dirt with fist-sized boulders.  As I commented to someone -- I don't remember who, exactly -- in the years since I had started riding motorcycles, my *bicycle* seat seemed to have become more firm while *my* seat had become less so :)  Since my Diamonback only has a suspension on the front forks, I finally had to stop to let some air out of my tires to cushion the ride a bit.  I don't know if it truly helped, but it at least seemed to take some of the edge off the ride.

Finally, we reached the Serenity Falls hut, and we were pleasantly surprised when we got there.  I've stayed in Forest Service/State Park cabins before, but Serenity Falls is much, much nicer than any of the other cabins I've ever stayed in.  The entire south-facing side of the cabin is covered in windows, showing off the falls and the Eklutna Glacier.  The hut sleeps up to thirteen people, including three double-bunks.  Half of the hut (the north side) is bunks.  A wall separates the sleeping area from the main room, which is equipped with two wooden tables, two stainless steel counter tops for preparing food and a large wood stove.  During the day, the south facing windows do a great job of keeping the hut warm; by night, the wood stove keeps the hut toasty.  Once we arrived in the hut and dropped our packs, everyone immediately started preparing food.  While everyone else was rehydrating freeze dried food or heating an MRE, I feasted on a monster-sized, double-cheese hamburger that I had grilled on my barbecue the night before.  It had to be close to a half-pound of hamburger meat, and right then, there was no finer meal to be had anywhere on earth.  What is it about camping that makes everything taste so GOOD?

Left to right, Eric, Joel and Pat at one of the tables at
Serenity Falls.
After eating our fill, we set about gathering firewood to keep the wood stove fueled throughout the night, and talking about whatever came to mind.  Night came far too quickly and soon, we crawled into our bunks, warm, well-fed and exhausted from the ride in.

The next morning, Pat and Eric hiked a little further up the trail towards the Eklutna Glacier while Joel, Nate and I started packing and cleaning up for the ride back home.  Too soon, we were ready to go.  The ride back was uneventful, and after two or three hours, we were back at the parking lot, where I had only three things on my mind: a Quarter-Pounder with cheese, a Mocha Frappe and a shower :)  Normally, I'm not one for fast food, but after biking 27 miles round trip with a 40-50 pound pack (I didn't bother to weigh it), I was craving the calories to restock my depleted reserves.

While I've spent many, many weekends at Eklutna Lake in the twenty-some-odd years I've lived in Alaska, this is the first time I've ever gone back to Serenity Falls.  I can guarantee it won't be the last.  Even though it was still too early for spring to have truly arrived at 1200 feet of altitude, this was a breathtakingly beautiful place to spend a weekend.  I can't imagine how gorgeous it must be when the trees are displaying all their glory and the falls -- cascades of blue ice this time of year -- are crashing down the mountainsides into the valley below.  Oh yes, I'll be back to Serenity Falls again.

Information on Serenity Falls and other Eklutna public-use cabins available at http://dnr.alaska.gov/parks/cabins/anch.htm

Sunday, April 17, 2011

Spring Cleaning

As I just posted elsewhere, I finally got around to doing some of the winter maintenance on my bike.  I replaced the air filter and oiled the chain.  I intended to change the oil and oil filter, but ran into a small snag...:

WHERE'S MY OIL FILTER?!?!?!

I think I really need to wash my bike!  That's on my agenda for tomorrow, followed by an oil change.

Monday, February 7, 2011

Electrical System Upgrades

I know there are people who ride their motorcycles all winter long, but I'm not one of them.  Whether that's because I'm not skilled enough or because I'm not dumb enough to try, I'll leave as an exercise for the reader :) but whatever the cause, there is a large block of time between November 1 and April 1 that my V-Strom just sits in the garage.  However, don't believe that means the Wee is neglected during this time; far from it.  This winter, at least, I am taking advantage of the down time to do some upgrades on the bike.  I've already posted the SW-Motech crash bar installation.  I'll also be changing the air filter, oil and oil filter before hitting the roads again this spring.

There are some electrical modifications I would like to make to the bike this winter, as well.  First, while the stock V-Strom headlights are pretty much amazing (much better than my Nissan Frontier, even), I'd like to add a little extra lighting to make the bike more conspicuous at night, so I'm adding fog lights.  Second, it can get a little chilly in south-central Alaska, even in the summer time, so I would like to add heated grips.  Third, after adding the TechMount PDA holder to the bike, I realized it would be good to have an auxiliary power port near the handlebars to supply power for my Android phone.  Using the GPS and Google Navigator sucks the battery dry much like an early '70s muscle car sucks a gas tank dry.  If I want to navigate with the Android for more than about an hour (especially in Alaska, where there are long stretches of highway with poor cellular service), I need a way to get juice to it.

Before deciding on these items, however, I had to take stock of the electrical load this would place on the bike.  From what I could find on-line, the V-Strom's alternator can supply about 40 amps of current.  EDIT: Pat (Greywolf) over at Stromtroopers suggests it may be a little lower -- 33A rather than 40A, with 10-12A available for accessories.. My thumbnail calculations suggest that my intended upgrades would add about 16 amps 5 amps:

  1. Fog lights: ~10 amps (2 x 55 watts @12 volts = 110 watts @ 12v = 9.2 amps) ~130mA (I found some LED H3 bulb replacements over at superbrightleds.com that I will be using instead of the halogen lights that came with my fog lights to keep current draw down);
  2. I am also replacing the stock incandescent brake lights with LEDs from superbrightleds.com, giving me one additional Amp (Note: they also sell straight 1157 replacemnt LEDs, but I decided to go with the motorcycle bulb after reading a report that the straight 1157s only illuminate directly behind the bike rather than lighting up the whole reflector);
  3. Oxford's Heated Grips: 4 amps (48 watts @ 12 volts);
  4. GPS power: 2 amps (my Android phone supposedly draws about 0.5 amp, but I'm providing a really large fudge factor for other devices).
The headlights draw about 10 amps, as do the high-beams and fog lights.  I can't imagine that the rest of the electrical system (ECU, brake lights, etc.) on the bike pulls 14 amps, so as long as I don't try to run fog lights and high-beam lights at the same time, I should be okay (anyone have experience to the contrary?). EDIT: based on Greywolf's suggestions (see link above), I think I should have more than enough power to run the new gadgets without overtaxing the electrical system on the bike. In fact, if my math is correct, I should still have 5-7A of current available, even with everything turned on.

After lots of trial and error, I decided to mount the fog lights at the bottom of the SW-Motech crash bars.  There is a fillet at the front of the crash bars where the bars wrap upwards around the engine.  That places the fog lights lower than I would like, where they could potentially be damaged by obstacles on the ground, but I when I tried to mount them inside the cowl, they didn't clear the forks.

Yes, it needs a longer bolt.  I'll fix it...eventually.
 Another problem I ran into with the fog light installation is finding a way to turn them on and off.  At first, I intended to buy a rocker switch from one of the electronic parts stores in town, but then I realized I would need a waterproof switch since I ride rain or shine.  I could trigger the relay with the current going to the headlights so that the fog lights would be on whenever the bike was running, but I wanted to be able to turn them on and off as needed.  I could just tie them into my high-beams, but I rarely use my high-beams (I don't want to blind oncoming traffic; just make myself a little more conspicuous).  After a lot of searching, I found a better solution.  Aerostich.com sells a nifty electronic module that ties into the on/off switch for your high-beam lights.  Trigger the high-beams for one second, and the autoswitch toggles power to another circuit.  If I connect the output wire from the autoswitch to a relay, I can turn the fog lights on and off at will.  Voila!  Problem solved :)

The next problem was trying to decide how to distribute power to all of these electronic gadgets.  I don't want to simply run a lead to the battery for each of these circuits, since that is a sloppy approach.  I don't want to clutter the battery with a slew of ring terminals, nor do I want to add more wiring than necessary to the bike.  I discovered that Suzuki offers heated grips as an option for the V-Strom, and that there is a power lead near the radiator that is designed to power the OEM heated grips.  This power lead only has power while the bike is running, so I can't inadvertently leave the heated grips or fog lights on when the bike is off.  This wire has a plastic quick-disconnect connector to allow you to easily add the heated grips after purchasing the bike, and Easternbeaver.com makes a wiring harness that is designed to plug into this connector to provide power to your accessories.  Eastern Beaver recommends that you only use it for low power accessories ("less than 7 amps"), but that is plenty of power to trigger a relay for all of my accessories.  If I connect a wire from the battery to a relay, trigger the relay with the heated grip circuit, then run the relay to a bus bar, I can provide switched power for all of my accessories directly from the battery.  Here's the schematic for the circuit:

Although I don't much care for Microsoft, Visio is a pretty good product :)
I have ordered and received the autoswitch from Aerostich, and I have just placed my order for the Eastern Beaver wiring harness so I don't have any photos of the installation process...yet.  I'll be updating this post as I install the new electrical circuits, and review the products I install.

Saturday, February 5, 2011

August Arctic Valley Ride

Just outside of Anchorage is a ski area called "Arctic Valley".  The road to Arctic Valley is a winding gravel road that technically is a part of Ft. Richardson, the Army post at Anchorage.  While Ft. Rich proper is a closed base, the road to Arctic Valley is open to the public.  In the summer, Arctic Valley is a popular spot for hiking and picking berries, like cranberries and blueberries.  It was also the first gravel road I took my V-Strom on.  Unfortunately, when I first tried to ride up Arctic Valley, there was still snow on the road a couple of miles from the top.  So, in August, I decided to ride the valley again :)

The day I rode back up to Arctic Valley, the skies were grey and weepy.  I couldn't decide if it was a light rain or a heavy mist, but whichever name you choose to assign to the precipitation, the result on the road was the same: it was very, very wet.  Up to this point, I had pretty much avoided muddy roads, but after 5,000 or so miles this season, my confidence was relatively high, so I pointed the V-Strom up the mountain, and gave a twist to the throttle.

All in all, I was quite happy with the V-Strom's handling on the wet gravel road.  While the stock Bridgestone TrailWing tires didn't feel quite as secure on the mud and gravel as they did on asphalt, the grip was surprisingly similar to what I had experienced on dry gravel: a little squirrely, but not too bad.  Just as on dry gravel and dirt, I stood up on the foot pegs and reduced speed a bit.  I had long ago discovered that decoupling my backside from the bike seems to have an immediate, dramatic and positive effect on bike stability when riding off pavement -- I think I tend to unconsciously overcompensate for every little wriggle of the bike on gravel, making the bike feel less stable than it really is.  When I stand up, those small oscillations are damped by my knees and ankles, and consequently, the bike "feels" more stable.  Whatever the cause, I can comfortably ride about 5MPH faster on gravel when I'm standing than when I'm sitting.

As for the ride itself...well, I love the mountains, and Arctic Valley is no exception.  At the bottom of the hill, just past the Ft. Rich golf course, I noticed a car in the oncoming lane had stopped, and the occupants were peering into the woods that lined the north-east side of the road.  I slowed down, trying to see what they were looking at, and was rewarded by the flash of a bear butt (not a "bare" butt, lol) as a small black bear, startled by the sound of my V-twin engine, disappeared into the woods.  I kicked myself for not having my Oregon Scientific camera, which is semi-permanently mounted on my handlebars, running at the time, but truthfully, I suspect the bear would have been out of the field of view, anyway.  I felt bad about scaring the bear (and ruining the encounter for the occupants of the car), but a stock Wee-Strom is pretty quiet, so I don't know what more I could have done.  I rode very carefully the rest of the trip, watching for bear and moose on the side of the road since both are quite common in this area, but there were no more to be seen.

A mile or so further up the road, I pulled over into a scenic overlook that overlooks Ft. Rich, Elmendorf AFB and Anchorage, and lowered the pressure in my tires a bit.  I typically run at 33-37 PSI on asphalt, but I've found that dropping pressure to about 25 PSI improves the feel of the bike on gravel.
As I lowered the tire pressure and snapped a few obligatory photos of the bike and of the view from the overlook, I was attacked by an angry swarm of hungry no-see-ums.  There are many things I love about Alaska, but the insect life is not one of them. Despite my best attempts to shoo the voracious little monsters away, several still found there way inside my motorcycle helmet, so I quickly jumped back on the bike and rocketed away in an attempt to flush the pests out with a 30 MPH breeze.  Unfortunately, that meant that I had to keep my faceshield open, and did I mention that it was raining?  I had a choice: tiny flying bugs buzzing about my face and ears, or stinging 30MPH rain drops in my eyes.  I chose the rain :)


Another couple of miles later, I reached the parking lot at the end of the road, and stopped to snap a few more pictures before riding back down the mountain.  As I had noticed on my early season trip up the mountain, riding down was a bit more intimidating than riding up the gravel road.


First of all, when riding uphill, if you find you are going a little fast, all you need to do is roll off the throttle a bit, and gravity will take care of the rest.  While the DL650 has remarkably good compression braking (allowing the rider to use the same technique when riding downhill), the effects of rolling off the throttle while riding downhill are subtly -- but critically -- different than when riding uphill.  If you determine that you need to slow down when riding uphill, rolling off the  throttle increases the friction available for cornering because you are no longer using a portion of your friction to propel you up the mountain.  When riding downhill, reducing the throttle (and therefore using engine compression to brake) decreases the amount of friction available for cornering because some of the friction is now being used to slow the bike against the pull of gravity.

At any rate, the V-Strom was sure-footed as ever, lending confidence to what suddenly appeared to be a much steeper downhill grade than the uphill grade I had just ridden a few minutes ago -- even though they were the exact same road :)  Approximately fifteen minutes later, I was west-bound on the Glen Highway, returning home after a fun hour or so playing in the Chugach Mountains.

Wednesday, February 2, 2011

V-Strom 650 Air Filter Change

It's winter in Alaska, and that means my bike is sitting idle for another two months, or so.  I have decided to take advantage of the down time to perform some needed maintenance: installing SW-Motech crash bars, adding an auxiliary power bus to the electrical system, changing the oil and oil filter, and changing the air filter.

I bought the bike 11 months ago, and have racked up 5800 miles since then, so it's definitely time to put a new filter in.  However, I have to admit, I didn't know how to get access to the air box :(  Notes I found on-line suggest that the air box is under the gas tank and that you need to remove both the fairing and the tank to perform the procedure.  Since I don't have a Suzuki Maintenance Manual ($$$), and there doesn't seem to be a Clymer manual for my bike yet, I turned to Google (the parts drawings on Bike Bandit are also a great resource).

That's how I found this blog post which describes the procedure, albeit on an '04 model.  I will try his instructions, and if I run across any differences between his '04 model and my '09, or if I find anything that needs more explanation, I'll post either supplementary notes or an entire procedure here.

Edit (04/17/2011): Well, it took me longer to get around to doing the air filter change than I intended, but I finally did it.  The deus ex machina write-up was very good, and the procedure was not at all difficult, once you get past the mental block of having to remove the gas tank and take apart half of the fairing.  That sounds like a real pain in the backside, but actually, it was a remarkably simple procedure.  If you've been putting off an air filter change in your Strom because it sounds like more work than you want to take on, take my advice: just go do it.  You'll be fine, I promise :) and your bike will be happy now that it can finally breathe easier.

Wednesday, January 26, 2011

Techmount PDA Mount Review

While riding to Kenai last summer, I took a wrong turn in Soldotna and nearly ended up riding to Homer, rather than Kenai.  Once that little voice in my head that was screaming "something isn't right, here!" got loud enough, I pulled off on the side of the road and consulted Google Maps on my Android phone.  But you know...it sure would have been nice to have the navigation at my fingertips, rather than inside a coat pocket, where I had to pull off on the side of the highway in order to retrieve the phone.

Much later last summer, I was scheduled to take a trip to San Francisco, and while I was there, I was going to rent a V-Strom and ride up to Redding, California.  If I can take the wrong highway in Alaska (there's usually only one or two highways going *anywhere* up here), I was certainly going to need some navigational help in California.  Once again, I consulted with Twisted Throttle and found this little gem.  It looked like it would be simple enough to install, even on a rental bike, so I went to my local Twisted Throttle distributor and ordered one.  Long story short, two months later, with my departure date quickly approaching, I called my local distributor, cancelled my order, and ordered the Techmount directly from Twisted Throttle.  The next day, the local dealer called me back and said the Techmount had arrived (go figure).  They were cool about it, however, when I said I had already ordered one directly from Twisted Throttle, so they will most likely get my business again in the future.  They really are good people to work with, and this is the first time I've ever had a problem getting an item from them.

Within a couple of days, I had the Techmount from Twisted Throttle.  The mount itself is a pair of semicircles that are bolted together with small allen head bolts.  Techmount includes three split-ring spacers, plastic rings about half an inch wide, with an outside diameter to match the inside diameter of the Techmount, which are used to adapt the Techmount to different sized handlebars or structural tubing on the motorcycle.

Installation was a breeze, so I won't belabour the process with a lengthy write-up.  Suffice it to say, step one is find the appropriate sized spacer for your application, and position it where you want the Techmount to be installed.  Place the bottom half of the mount underneath the spacer, place the upper half on top of the spacer, and install the allen bolts to hold them together.  After installing the mount rings, install the short mount shaft to the upper mount ring, and secure it in place with -- you guessed it -- an allen bolt.  In the photo to the left, you can see the inner spacer ring, the upper and lower mount rings and the shaft of the mount.

The top plate is actually two pieces -- an adapter and the PDA holder itself, as you can see in this photo.  The PDA holder can be mounted with a left to right orientation, as I did, or with a fore and aft orientation (landscape mode or portrait mode, respectively).  If you want to mount a GPS with standard mounting screws, you can leave the PDA holder off and mount it directly to the adapter, I believe.

Here's the cockpit view of the completed installation.


Even though it was nearly the end of the riding season, freezing conditions held off long enough for me to squeeze in a couple of rides with the Techmount and my Android.  Overall, I'm pretty happy with the purchase.  The Techmount holds the phone very securely.  Any jolts strong enough to dislodge the phone would probably dislodge me and/or damage the suspension.  The Techmount is designed to allow you to adjust the positioning in several directions, so no matter where you mount it, you should be able to get a good view of your PDA or GPS with little effort.  On the minus side, the elastic over the screen interferes with touch screen operation a little, and if I'm not careful, the lower clamp on the PDA holder tends to squeeze on the volume control on my HTC Hero, adjusting my ring or navigation volume settings.  Additionally, the location on the handlebars means I have to shift my focus from the road to the PDA -- not a good thing in high-speed or heavy traffic.  Finally, I was also slightly annoyed to find that for such a simple device, Techmount saw fit to use allen screws with three different sized heads, requiring three different sized wrenches to adjust.  Seriously, couldn't at least one of those sizes have been eliminated?

All things considered, if I had a full-sized Garmin or Tom-Tom GPS, I'd probably go with this GPS mount rather than the Techmount, since it would be more in your line of sight while riding.  However, since all I currently have is the GPS on my cell phone, the Techmount meets my needs.  If you need an inexpensive, simple, easy-to-adjust way to mount your PDA on your bike, the Techmount is a good choice at a reasonable price.