Showing posts with label Bikers Against Child Abuse. Show all posts

Tuesday, December 22, 2015

Miscellany

Mid-winter a few years ago, a co-worker asked, "What do you do for fun, once the riding season is over?" Having just acquired the XS750 project, I replied, "There are two seasons in Alaska: riding and wrenching." I don't like to waste my riding season working on the bikes, since the riding season is short enough as is, and invariably, once I start working on a bike, I'll end up with it off-line while I'm waiting for parts to arrive. On the other hand, I do enjoy tinkering on the bikes, so taking them apart to perform all the maintenance and upgrades during the off-season -- when I can't ride, anyway -- is a good way to spend the cold, dark winter months. To that end, I have thrown myself into work on all three of my bikes over the last two months.


In August, I rode my ultra-reliable V-Strom to work one morning, and noticed that it was acting funny while I was idling at a stop light. The turn signals were kind of flickering rather than blinking, and the engine seemed to be running rough, which is very unusual for that bike. I revved the engine a bit, and it settled down, leading me to think that I had a dead battery. That wasn't particularly surprising, considering that it's still the original battery -- six seasons old, now. After work, sure enough, there wasn't enough juice to start the engine. Fortunately, a co-worker was able to jump start me, and I made it home...but just barely. I needed the bike running ASAP, since our motorcycle organization had an event that weekend (this was a Thursday), so rather than taking the time to perform full diagnostics, I jumped to the most likely cause -- a dead battery -- and bought a replacement the next day. After work, I plugged in the new battery, started the engine, and connected a multi-meter to the battery terminals, reading 12.3VDC...not good. I should have been reading just over 14VDC. I took the Yamaha on the BACA event, then ended up ordering both a replacement voltage regulator and stator...at which point, I found that I also needed a gasket for the stator cover, since the V-Strom drips oil onto the stator to keep it cool. I believe I already mentioned something about invariably waiting for parts, once starting a maintenance project?

...all the while, I'm riding the 5000-RPM-idle cafe racer to BACA events...

...an hour away from home, one-way...

...in the rain.
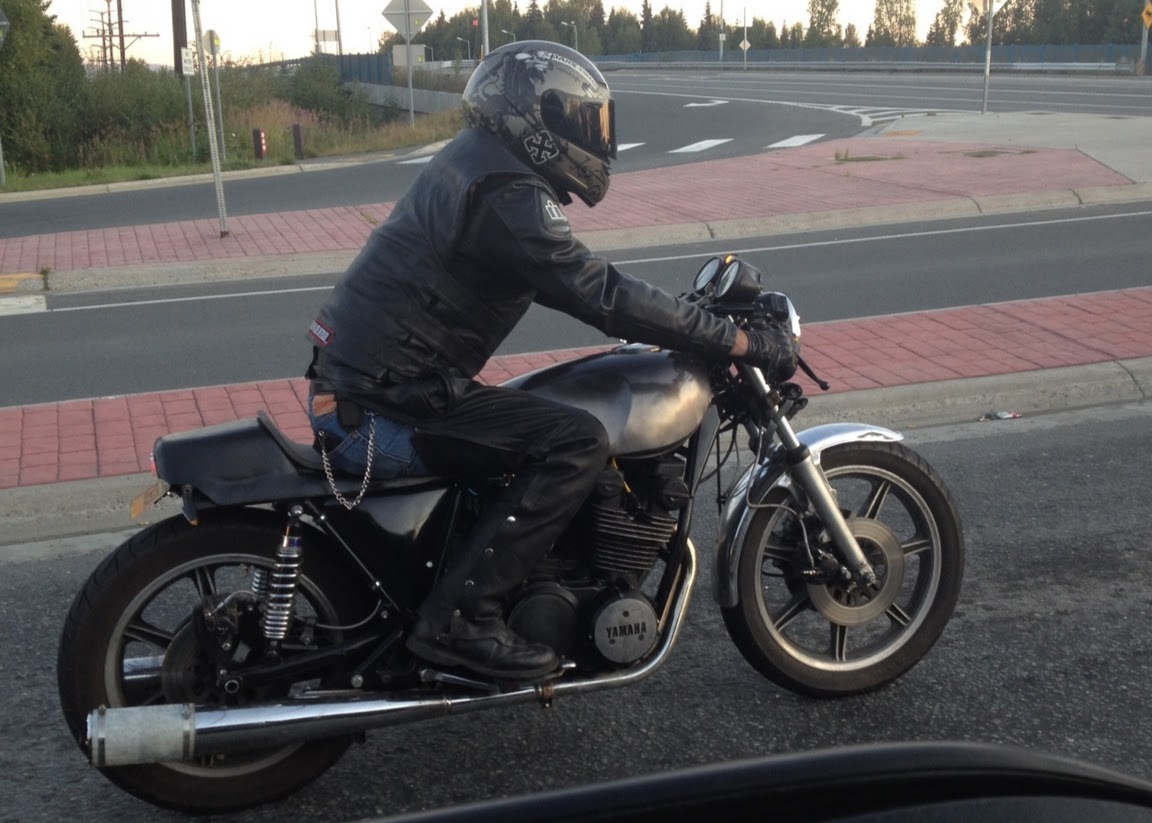

The cafe racer is a fun bike, but with clubman handlebars and NO fairing to protect from the weather, while wearing leathers only in the rain (no rain suit, because my orange nylon rain suit does not exactly scream, "I am a bad-*** biker, and can keep you safe from those who mean you harm") at maybe 40F...not so much.

I was really missing my fairing, my heated grips, and my heated jacket liner, lol (fine, I'm a wuss; what's your point?!?!)

Then, on yet another cold, rainy day on the cafe racer, I started having problems getting the bike into first gear. I could shift into neutral, second, third, etc., but I had a bear of a time getting the bike to downshift into first at intersections. In frustration, I parked the bike, and caged it with my wife to escort one of our BACA kids to court, then when I got the chance to check the Yamaha Triples web site, I discovered that the XS750's have a tendency to break the layshaft bolt, which then causes difficulty shifting into first gear.

Great...with maybe three weeks left in the riding season and BACA Anchorage getting busy working with kids, I had not just one, but *TWO* broken bikes. The whole point of having a second bike was to have an alternate in case a bike broke down!

With the Yamaha now out of service, I jumped into high-gear trying to get the electrical problems with the V-Strom sorted out, since fixing the charging system seemed like a more manageable task. Yeah...no. After finally getting it all put back together again, I took the Strom out for a 10:00 p.m. shake down ride. I was elated for the first eight miles, as the cheapie Amazon.com volt meter that I had plugged into the accessory electrical socket was showing a steady 14.4VDC while riding. Then all of a sudden, I noticed that my voltage was dropping: 13.7V...13.6V...13.5V...about a tenth of a volt per second, more or less. I quickly whipped a U-turn and raced back home...12.9V...12.8V...7.0V. Wait, what?!?! 14.0V...12.2V...13.1V...I started seeing wild voltage swings all over the place, and my LCD panel on the bike had gone completely blank. The engine was running rough again -- the ECU wasn't getting good voltage, so the fuel injection was getting squirrely -- and I just barely made it home (the bike died in the driveway). I opened up the bike -- AGAIN -- and determined that the brand new regulator/rectifier had failed. I parked the Strom, because quite frankly, I was completely fed up with it. I had sunk $450 in parts on the V-Strom in the last two months, and it STILL didn't work right. I spent the rest of the season riding my wife's CB750A to BACA events, and caging it to and from work, sigh.

Fortunately, this was the point that I found the GL1000 project, and I had so much fun working on this bike, that I eventually built up enough motivation to dig into the V-Strom again. Electro-Sport made good on their warranty of the regulator/rectifier, which I re-installed last night, and which now seems to be working properly.


Then, I managed to obtain spousal approval on a pair of Dime City Cycles mufflers for the Yamaha, which are now sitting in the garage, waiting for me to fabricate new balance tubes and connecting pipes to the existing headers. After that, I'll need to drain the oil and dig into the transmission case to replace the layshaft bolt. Oh, yeah...and I've got an envelope full of carburetor parts -- butterfly shaft screws, butterfly shaft seals, circlips, and springs -- for the XS750. Hopefully, those will resolve the high-idle problem on the cafe racer; if not...new carbs?

As for the GL1000...it needs a new voltage regulator, too. Unlike the V-Strom, the 'Wing uses a separate voltage regulator and rectifier, but most of the after-market units I have found seem to be integrated. Oregon Motorcycle Parts makes a reasonably priced unit that seems like it would fit the bill quite nicely, and in my initial conversations with them, they seem to be pretty good people to work with. I expect to have their VRRPM3H-GL1000 model on order in the fairly near future. After that, lower handlebars (so I can connect the front brake line), and a new battery...and the GL1000 should be running! I still want to replace the rear shocks with Hagon 2810 TTSA's, like I did on the Yamaha, and I'd like to order new side covers and shelter covers from E-Bay, because I'd like to go satin black on the 'Wing, but I don't want to ruin the original plastic, since it's in reasonably good shape. However, that's all wish-list material, not necessary-to-get-the-bike-running items ;)

Wednesday, November 11, 2015

Liter Bike!!!

As I've mentioned before, my very first motorcycle was a 1978 Honda GL1000 -- one of the original Goldwings -- with the engine in pieces.
Against my better judgment, I sold that bike before I ever got it running, and I've kicked myself ever since. Then, in March of 2010, I bought my Suzuki V-Strom
which has been a great bike, and which I've truly enjoyed.

However, I've run into a bit of a conundrum recently. About two years ago, my wife and I joined a motorcycle group that "...seeks to empower abused children to no longer be afraid of the world in which they live." My XS750 cafe racer,
while a lot of fun, isn't really ideal for riding with this group: it still idles at 5,000 RPM once it's warmed up, the exhaust is rusting to pieces (more on that in another post, coming soon to a web browser near you!), the rear view mirrors and tail lights are all but useless (which makes it kind of hard to keep an eye on the riders behind me -- or for them to interpret my intentions --when riding in a group), and I removed all of the provisions for carrying passengers. Making things worse, while my wife is a capable rider with a bike of her own (a pristine 1977 Honda CB750A Hondamatic)
it also has a few characteristics that make it..."sub-optimal"...for riding in our group. Although it's a very cool piece of history, it's not a terribly fast bike (yeah, it's a CB750, but the Hondamatics had a significantly de-tuned version of that engine) among other things. Consequently, she often rides pillion on my Suzuki V-Strom when we are riding with the group.

While I can ride two up in the group on the Wee-Strom, it too is less than ideal for this purpose. First, surrounded by a big-bore Kawasaki Vulcan, a Honda VTX-1800, several Harley-Davidson's (go figure), and a bunch of H-D trikes, the Strom sticks out like a very tall, bright orange, sore thumb.
It just doesn't look the part. More importantly, as much fun as it as when ridden solo, the Strom is a bit under-powered and under-sprung for riding two-up, especially when riding in a group of torquey, large-displacement cruisers. Finally, the brakes are a bit soft for carrying two full-grown, American adults at highway (ahem...) speeds. To solve this problem, my wife and I considered buying her a Sportster 1200 with a Frankenstein trike conversion kit but although it was a hoot to ride and would certainly have looked the part in the motorcycle group...well, it just wasn't a good fit.

We talked it over, and decided that maybe I should sell the V-Strom and buy a more capable two-up bike. After reviewing the options, I had narrowed the list of potential mounts down to a 2016 Suzuki Bandit 1250, a 2015 Triumph Speed Triple,
and a brand new, unsold 2013 Honda CB1100.
Once again, none of these bikes were quite right. The Bandit was the most practical choice, but would need suspension upgrades since they are reportedly undersprung, just like my V-Strom. The Speed Triple was the bike that set my pulse racing, but the passenger seat was a joke, the bars were really low for riding any length of time (although not as bad as my XS750), and I was worried about insurance costs on a hooligan bike like that. The CB1100 would probably be the most comfortable, but I didn't like the red paint, it had no windscreen, and while checking it out at the local Honda dealer, I was already making a list of modifications to make it more of what I wanted (read that, "$$$"). It would have worked, but it just didn't make sense to drop roughly ten grand on a brand new bike, then chop it up to re-make it the way I wanted.

No, none of these bikes were ideal, even if they were a step up from my V-Strom.

Then, the other night, my wife was looking at the bikes for sale on Craigslist when she found a 1978 GL1000 project. Hmmm...I like GL1000's...
Better yet, even after upgrades, the price is low enough that I wouldn't have to sell the V-Strom, and I've seen a couple of seriously cool GL1000 custom bike builds. I set out making a list of upgrades, changes, and simple maintenance items to make a vintage Goldwing suitable for our needs, and came up with the following preliminary list:

Item Justification Parts List Cost
Brake Rebuild The current owner already has removed the front brakes for a rebuild, and as I found with the XS750 project, neglected brakes are a nightmare. Rebuild these now before they end up in as poor shape as the front brakes on the Yammie were when I bought it. K & L brake caliper rebuild kits, K & L master cylinder rebuild kits, new brake pistons (cheap, and solves a lot of problems), braided stainless steel brake lines. $425
Dime City Cycles "Euro" Handlebars As I recall, the stock GL1000 handlebars aren't that bad -- way better than those evil monstrosities, invented by the ghost of Torquemada himself, that Yamaha shipped on the XS750 -- but I'd like something a little sportier. This would be a much lower priority change, but I really want to replace the old brake lines before riding season, and I'm not going to buy braided stainless steel brake lines twice for this bike. That's just a waste of money. Dime City Cycles "Euro" Handlebars $50
New Headlight Bike had a Vetter fairing; needs new lights and mounting hardware. E-Bay "Dominator" headlights and cafe racer fork ears. $140
Replace Timing Belts Cheap insurance. Bike has an interference engine. If a timing belt breaks, you will be tearing down the engine to replace pistons and valves. That's why the engine on my first GL1000 project was in several Rubbermaid boxes when I acquired it. Gates timing belts. $30
Uni Foam Air Filter Easy, inexpensive maintenance/performance upgrade item. Uni foam air filter $25
Ignition System Refurb Spark plugs are a no brainer. Coils and wires are relatively inexpensive and simple to replace, also. Finally, points and condensers wear out, giving a weak spark. Replacing these parts should make for a better running engine. DR8EIX spark plugs, coils t.b.d., 7mm silicone spark plug wires and NGK spark plug boots from Mike's XS, and a Sudco tune-up kit. $200
Suspension Upgrades Suspension is one of my key concerns. Vintage bikes are notoriously undersprung, and I've been happy with these springs and shocks on my XS750.
Note: I'd prefer Race Tech springs and valve emulators in the forks, but at 1/3 the cost, these win the cost/value argument.
Progressive Suspension fork springs and Hagon 2810 TTSA shocks. $414
Total: $1284


There are other things I'd like to change too, but this should be enough to get the bike to the point where it is reasonably reliable, comfortable, good looking, and capable of running with the best of them while two-up. I won't be schooling competent sportbike riders in the twisties on a vintage Goldwing, nor will I be the flashiest bike in the state, but this should be a vast improvement over the status quo. And, I'll get to regain some of that karma I lost when I sold my first GL1000 project, lol.

I'll go take a look at the GL1000 tomorrow, and who knows? Maybe by tomorrow night, I'll be the proud owner of yet another GL1000 project bike ;)

Edit: I bought the 'Wing:


There are a few maintenance items that need to be completed before it's ready to ride, but in all honesty, it's a very clean bike for its vintage. After looking it over, I've changed the planned maintenance slightly. There are a few things that have already been taken care of, and a few things that I probably won't change until after the bike is running (function first, cosmetics later -- a lesson I learned from the XS750 project). Here is a Google Sheets document outlining the plan in more detail. I'll leave the table above as a snapshot of the original plan, but the Google doc will be changing as work progresses.

Monday, July 6, 2015

Too Much Wrenching, Not Enough Riding!

I can't believe it's already July.

Summer came early to Alaska this year. Usually, it's the first week of May before enough ice has melted off my driveway for me to be able to get the bikes out; this year, I was commuting to and from work by mid-April. The weather since then has been phenomenal too, with June being a long series of clear, blue, sunny days with temperatures as high as I've seen them since I moved to Alaska some twenty-odd years ago.

So, of course, I spent most of the month of June laid up with an injury that kept me off the bikes entirely during the best two weeks of the month, and then spent the remainder of the month just commuting back and forth to work. I'm almost recovered now, but as a result, I have only taken the Strom out of town once this summer, for the B.A.C.A. 100 Mile Ride. Sigh...

However, even if I haven't been riding as much as I'd like, I've been making progress on the Cafe Racer project. After blowing the head gasket on the Yamaha triple last summer, I picked up a new engine gasket kit from Athena and rebuilt the top end of the XS750. While I had the engine apart, I borrowed an ultrasonic cleaner from a co-worker, disassembled the carburetors, and cleaned the carbs (again...) to try to solve the high idle problem I've been fighting since I bought the bike. After ultrasonically cleaning the carbs, I noticed a ridge of gum inside the carb where the butterflies close, so I did some heavy-duty cleaning on the inside of the carb and the outside edge of the butterflies with some 1500-grit sandpaper, but still can't get the bike to idle properly (grrrr...). I also tested moving the needle valve clip to the stock position (the center position of the five possible settings), but the bike feels like it lost off-idle response and stumbles upon initial throttle input now, so I'll be moving the needle valve clip back to one setting above stock (one setting more lean).

One minor problem I noted with the Cafe Racer last summer was that the front forks felt rather soft -- not surprising, since I have no idea if the fork oil had *ever* been changed. Consequently, I purchased a set of Progressive 11-1107 fork springs from Amazon.com, and rebuilt the forks this past weekend, which turned out to be a much simpler task than I expected, once I figured out a couple of tricks to getting the forks disassembled:

  1. Don't Remove the Forks Completely:
    To remove the fork guts, you'll need to remove a spring clip in the top of the fork. The service manual says to hold the fork tube in a padded vise, then depress the cartridge inside the fork to pop the spring clip loose. I didn't have a padded vise, but was able to make do by lowering the fork in the triple clamps until only about an inch of the fork stuck up above the lower clamp, then tightening the bolts on the lower clamp. Then I used this tool here...:

    ...to depress the cartridge inside the fork...

    ...so I could pop the spring clip loose with a small screwdriver like so:

    NOW go ahead and remove the forks completely for the rest of the work!
  2. Pry Out the Oil Seals from Underneath:
    The next problem I ran into was getting the oil seals out of the fork bottoms. I spent a while trying to dig the oil seals out from the top before finally using the biggest flatblade screwdriver I owned as a pry bar to pop the oil seals out from underneath. Set the blade of the screwdriver under the oil seal, then place the shaft of the screwdriver on the top of the fork. Press down on the handle until the oil seal rotates 90 degrees in the fork, then pull it out with your finger. Easy ;)
  3. Make Sure You Have New Dust Seals:
    I didn't pick up new dust seals before starting on the forks. The dust seal on the right-hand fork looked to be in decent shape, so it probably would be fine, but since the left-hand dust seal is cracked and in pretty rough shape, I'll probably just replace both...once I get a new set of seals...which means I'll have to remove the forks from the triple clamps again in a few days or weeks :roll_eyes:
  4. Don't Forget the Washer Between the Springs and the Pre-Load Spacers:
    Yep, I forgot to install my spacer, so I had to partially disassemble the forks again. Fortunately, this gave me the opportunity to snap the photos above, since I didn't take any pictures at all the first time ;)
  5. Use a Torque Wrench to Tighten the Triple Clamps:
    Otherwise, you end up with a problem like this:

    Yep, I over-tightened one of the bolts and sheared it in half. Fortunately, it was easy to drill out from behind, so tomorrow, I'll pick up four new bolts (might as well just replace them all) and finish up the fork work.

Really, those were the only significant "gotcha's." Everything else was pretty straight-forward. Progressive included a piece of plastic tubing to use to set your spring pre-load with their kit, which means you have to cut the tubing to size for your application. They give measurements for a number of bikes, but unfortunately, the XS750-2D wasn't one of them. However, the XS850 was, and the size recommended for the 850 (1 1/2 inch) was almost exactly the same as the difference in length between the OEM springs and Progressive springs, so I used that. I haven't had a chance to test ride the bike since installing the springs because I can't kick start the bike right now (the aforementioned injury that had me laid up for most of June), and I've removed the electric starter, so kick-starting is the only option for firing up the Yammie. However, once I get a chance to test ride the bike, I'll edit this post with an initial impression on whether or not 1 1/2 inches of pre-load was a good call.

I also might have to revisit the amount of oil I added to the front forks, since I was a bit confused by Progressive's instructions on the subject. After reading and re-reading the instructions, then trying to figure out how to use the Motion Pro fork oil measuring tool, I think I added the right amount of fork oil, but I'm not certain. Again, once I get a chance to test ride the bike, I'll adjust the oil level as required to get the compression and rebound damping reasonable.

Thursday, December 5, 2013

Fricken' Awesome!

My wife recently found a video (sorry, I don't have the link or I'd paste it here) that I found really intriguing, and then today, I ran across the same story from a link at Yamaha Triples.

This is SO many levels of awesome!

Out of curiosity, I followed a link to B.A.C.A.'s web page, where they have a list of local chapters, and...

Crap. No Alaska chapter >:(

Could a scrawny (6-foot-0, 180 pounds) ADV-type start a chapter up here, I wonder??? Anyone else here in AK interested in signing up?

Edit: I contacted the national organization, and they put me in touch with a guy here in my local area who used to be a member in the Lower-48. Everything is still in the planning stages now -- nothing is for certain, yet -- but it looks like we might have enough interested folks to get a chapter started up here! I'll keep the blog updated if (and "as") things start happening.