I've never been a "loud pipes save lives" guy. I believe paying attention and playing the "what-if" game ("what's the stupidest @#$&!!! thing another motorist around me can do, and what will I do when -- not if -- they do it?") are the best ways for a motorcyclist to keep him/her -self safe. I've also always held the opinion that being courteous when sharing the road was a good idea. I've often cringed when another motorcyclist with straight pipes rode by, worrying that non-motorcyclists would lump us all in the same group. To me, the "loud pipes save lives" crew has always seemed like they were trying to rationalize their unbaffled exhausts with a thin veneer of justification. However, I'm starting to think that I was wrong. Loud pipes might not be such a bad idea, after all.
So I'm on my way to work on my V-Strom the other day, cruising down a 45MPH, secondary road (two northbound lanes, two southbound lanes, and a suicide lane down the middle). I'm in the right-hand northbound lane when a dually work truck pulls out ahead of me. No problem; he's far enough ahead that I can slow down or change lanes to avoid him. There's a four door Jeep Wrangler in the left-hand lane, but I've got room to change lanes, so I do. About the time that I turn off my turn signal and get stabilized after changing lanes, some complete tool in the suicide lane pulls into my lane so effing close that there's no time for me to brake, and the work truck is still just slightly ahead of me in the right-hand lane, and not yet up to the speed of traffic. I do a quick assessment of my options (not many), and think to myself, "I'm not gonna avoid this one. This is gonna hurt."
Fortunately, my guardian angel (who has got to be mainlining Valium at this point in my life, and who is well past due for a promotion, lol) points out the one escape route I have available. Maybe. It's marginal, but the only other option I have is to go over the hood of the Escape or CR-V or whatever little SUV it was that pulled in front of me (identifying make and model was honestly not at the top of my priority list at this point), so I grab a fist-full of throttle, and go for it.
As it turns out, there was *just* enough room for me to lane split between the SUV and the work truck, even on my wide-butt Suzuki, and I managed to successfully slip between them before I rocketed down the road ahead of them, wanting to get as far as possible from the distracted driver in the SUV as fast as possible.
As readers of this blog will know, I've been trying to figure out how to repair the broken, obnoxiously loud exhaust on my Yammie for a while, but ya know...after this incident, I don't think I will, after all. I'll probably do enough work to clean up the cosmetics on the XS' exhaust, but no one has *EVER* been unaware of me on the (103+ dB) Triple, whereas on my (83dB) V-Strom, I've had more than enough close calls. In fact, I think I'm even going to retrofit my Strom to a louder can, as well.
I originally posted a slightly shorter version of this rant on one of the forums I frequent, and several people chimed in with various observations about the pros and cons of this plan, including some interesting things I hadn't thought of, like an anecdote about revving the engine on a louder bike to make sure that an obviously distracted driver knows you are there. Since, in our society, honking the horn is often used to express displeasure with other motorists rather than to politely get someone else's attention, revving an engine once or twice on a sufficiently loud motorcycle can draw others' attention to you without the baggage associated with honking your horn.
Others, of course, took issue with my decision to make sure my bikes were loud enough to draw attention to them, mostly due to the fact that being loud can be offensive to others. I get it. That's why I've ridden my Strom for six years already with the stock exhaust. That's why repairing the broken exhaust on my Yammie was such a priority for me. But here's the rub: I can't count the number of times I've had to take evasive action to avoid another motorist who obviously didn't see me. Some of them were merely annoying; I had options and was able to avoid the conflict by adjusting speed and/or position without much drama. Others were a little more memorable, like the teenager in the bright orange H2 Hummer who looked me in the eye, then pulled out Right...Freaking...In front of me (and then tailgated me after I swerved past him in the oncoming lane of traffic!!!) or the twenty-something punk that had a near-death-experience (although he didn't know it) after he cut me off with so little room to spare that I locked up my rear brake TWICE to avoid crashing into the rear quarter panel of his car. This year, however, I've had two instances where I really didn't think I was going to be able to avoid the accident. Fortunately, I was wrong both times, but these two incidents have shaken me up enough that I'm seriously re-thinking my stand on loud exhaust systems on motorcycles. As a good friend of mine recently said in a Facebook post, "An aftermarket exhaust is cheaper than your deductible." Hmmmm...that's actually a really good point!
If cagers are so self-absorbed and self-centered that they can't put down the cell phone for the twenty minutes it takes to get to work, can't be bothered to put on a turn signal before changing lanes, and can't be bothered to perform a head-check or even look in their rear-view mirrors before pulling into traffic, then I no longer care if my exhaust disturbs their Zen moment with Enya on their 1200 Watts of Dolby Surround Sound during their morning commute. My right to have a reasonable chance of arriving alive at my destination is just a little more important than your right to peace and solitude inside your insulated cocoon. Sorry.
So here's the deal: I'm going to try to find a louder-than-stock exhaust for my Strom that (hopefully) will drop the weight a bit (OEM exhausts are notoriously heavy), that (hopefully) will improve performance and/or gas mileage a bit, and that (hopefully) will garner a little more attention from other motorists when I ride. I'm shooting for something that won't be obnoxiously loud, but I definitely am looking for something louder than stock. From the evidence I've seen, motorcycles are all but invisible to other drivers; I'm tired of being silent (or close enough, anyway) as well.
[end rant]
Showing posts with label Accessories. Show all posts
Monday, June 29, 2015
Saturday, April 21, 2012
Last of the Winter Accessories
Here is the last of the new accessories I picked up over the winter for the Wee-Strom:
That's my grandson Clark in the baby seat. He was born last September 22, missing my wife's birthday by a matter of hours :(
For those of you about to get up in arms about taking a baby on a motorcycle, if you notice, I'm not wearing all my gear. This was staged just for the photo; his mom was just out of the frame to the right of the photo, laughing (well, more like rolling her eyes, lol).
Sunday, April 15, 2012
DIY Tool/Fuel Tube
One of the reasons I bought the V-Strom is its range. The 2009 DL650 has a 5.8 gallon gas tank, and my experience so far says the DL650 gets an average of 43.6 miles per gallon, for a total range of 231 miles (with a 1/2 gallon reserve). However, sometimes in Alaska, gas stations can be quite a ways apart, and you never know for certain if the next gas station will be open when you arrive since many of them are seasonal. If you are out for an early or late season ride, will your planned fuel stop at 220 miles still be open? Will you have enough range to backtrack to the last open gas station if it's not? So I started looking around for options for some additional gasoline, just in case.
My ideal solution is Peg-Packer. Available in one or two gallon sizes, this looks like a great way to add range without raising the center-of-gravity of an already top-heavy bike. Unfortunately, my budget for goodies is pretty much spent this year. Another, more affordable, option that I found is the Mega-Tube Fuel Combo. This looks like a really nice solution, and it's roughly 1/3 the cost of the Peg-Packer (although, it carries 1/4 the gas, so arguably, the Peg-Packer is the better deal).
However, I've already got several MSR fuel bottles from 11 oz. to 22 oz. for my dual-fuel camping stoves and lanterns. How hard would it be to roll my own Tool/Fuel tube? I went to my local Lowe's to find out. Here's what you need to buy, if you want to try it yourself:
Materials List:
Procedure:
First, measure the length of the fuel/tool tube. I wanted mine to be large enough to carry a 22 oz. and an 11 oz. fuel bottle, so I laid the ABS pipe on a shelf next to two fuel bottles stacked end-to-end.
Next, test fit the tube on your bike.
Scuff up the ends of the tube with some sandpaper so the cement will adhere better. Scuff up the inside of the end cap, as well.
Make sure you are using the right kind of cement for your tubing. I am using black ABS tubing, so I bought ABS cement.
Smear some cement on the outside of the tube where the cap will go, and on the inside of the end cap. Make sure all of both surfaces are coated, but don't use so much that it runs or creates globs of cement. You want a thin, even coat on both surfaces.
Twist the end cap as you slide it into place on the end of the tube. Make sure it is pressed as far onto the tube as it will go.
Scuff up the outside of the other end of the ABS tubing and the inside of the coupler. Smear some cement on the tubing and the inside of the coupler, then press the coupler over the end of the tube, again, twisting it slightly as you press it into place...
...like so.
This cap comes in two pieces: a threaded end cap, and a plug that screws into the end cap. Scuff the outside of the end cap, smear some cement on it, smear some cement on the inside of the other half of the coupler, and press the end cap into the coupler. You guessed it -- give it a little twist as you push it in place.
Here is the completed tool/fuel tube.
Here is the tool/fuel tube fixed in place on my left-hand side carrier with zip-ties. I'll try to find some padded aluminum straps to permanently attach the tube, but for now, this should work.
Edit: I've had the tool tube on the bike for almost a work-week now, and I have found two problems with my design so far. First, by making it large (long) enough to carry two fuel bottles, I have a bit of a problem. If you have two bottles in the tube, retrieving the top bottle is trivial...but what about the bottom bottle? How do you reach a fuel bottle that is halfway down the tube? A three inch diameter tube is too small for my hands to fit inside. To solve this problem, I am thinking about incorporating some kind of leash or strap inside the tube that will either fit under the bottle or through the lid that you can use to pull the bottle out. While carrying a water bottle to work this week, I have used a length of copper wire (it was handy...), but I started using it like a spring until this morning, when it got crushed into the bottom of the tube. Now the copper wire *AND* my water bottle are trapped at the bottom of the tool tube :banghead:
Second, I picked up a 33 oz. MSR fuel bottle at the local outdoors shop since I want the most distance possible with the bike. Unfortunately, the new MSR bottle is about 1/16 inch too wide to fit into the tube. It is so close, but won't quite fit. The ABS tube is stout enough, I am thinking of gluing some sandpaper onto the tapered top of the bottle, then using it to grind away enough width on the tube for the larger size bottle to fit, but I'm not certain it's worth the effort. As is, I can fit a 12 oz. bottle and a 22 oz. bottle into the tube, so maybe I'll just use the tube to carry them, and if I am really worried about range (say on a ride to Deadhorse), I'll strap the 33 oz. bottle to the top of my Pelican cases, giving me almost a half gallon of extra gas.
My ideal solution is Peg-Packer. Available in one or two gallon sizes, this looks like a great way to add range without raising the center-of-gravity of an already top-heavy bike. Unfortunately, my budget for goodies is pretty much spent this year. Another, more affordable, option that I found is the Mega-Tube Fuel Combo. This looks like a really nice solution, and it's roughly 1/3 the cost of the Peg-Packer (although, it carries 1/4 the gas, so arguably, the Peg-Packer is the better deal).
However, I've already got several MSR fuel bottles from 11 oz. to 22 oz. for my dual-fuel camping stoves and lanterns. How hard would it be to roll my own Tool/Fuel tube? I went to my local Lowe's to find out. Here's what you need to buy, if you want to try it yourself:
Materials List:
- 2 foot length of 3" ABS pipe (my local Lowe's sells them in 2 foot lengths; you can buy a full length pipe and cut to size if you want);
- cap for 3" ABS pipe;
- coupling for 3" ABS pipe;
- screw-top cap for 3" ABS pipe;
- ABS cement.
Procedure:
First, measure the length of the fuel/tool tube. I wanted mine to be large enough to carry a 22 oz. and an 11 oz. fuel bottle, so I laid the ABS pipe on a shelf next to two fuel bottles stacked end-to-end.
Next, test fit the tube on your bike.
Scuff up the ends of the tube with some sandpaper so the cement will adhere better. Scuff up the inside of the end cap, as well.
Make sure you are using the right kind of cement for your tubing. I am using black ABS tubing, so I bought ABS cement.
Smear some cement on the outside of the tube where the cap will go, and on the inside of the end cap. Make sure all of both surfaces are coated, but don't use so much that it runs or creates globs of cement. You want a thin, even coat on both surfaces.
Twist the end cap as you slide it into place on the end of the tube. Make sure it is pressed as far onto the tube as it will go.
Scuff up the outside of the other end of the ABS tubing and the inside of the coupler. Smear some cement on the tubing and the inside of the coupler, then press the coupler over the end of the tube, again, twisting it slightly as you press it into place...
...like so.
This cap comes in two pieces: a threaded end cap, and a plug that screws into the end cap. Scuff the outside of the end cap, smear some cement on it, smear some cement on the inside of the other half of the coupler, and press the end cap into the coupler. You guessed it -- give it a little twist as you push it in place.
Here is the completed tool/fuel tube.
Here is the tool/fuel tube fixed in place on my left-hand side carrier with zip-ties. I'll try to find some padded aluminum straps to permanently attach the tube, but for now, this should work.
Edit: I've had the tool tube on the bike for almost a work-week now, and I have found two problems with my design so far. First, by making it large (long) enough to carry two fuel bottles, I have a bit of a problem. If you have two bottles in the tube, retrieving the top bottle is trivial...but what about the bottom bottle? How do you reach a fuel bottle that is halfway down the tube? A three inch diameter tube is too small for my hands to fit inside. To solve this problem, I am thinking about incorporating some kind of leash or strap inside the tube that will either fit under the bottle or through the lid that you can use to pull the bottle out. While carrying a water bottle to work this week, I have used a length of copper wire (it was handy...), but I started using it like a spring until this morning, when it got crushed into the bottom of the tube. Now the copper wire *AND* my water bottle are trapped at the bottom of the tool tube :banghead:
Second, I picked up a 33 oz. MSR fuel bottle at the local outdoors shop since I want the most distance possible with the bike. Unfortunately, the new MSR bottle is about 1/16 inch too wide to fit into the tube. It is so close, but won't quite fit. The ABS tube is stout enough, I am thinking of gluing some sandpaper onto the tapered top of the bottle, then using it to grind away enough width on the tube for the larger size bottle to fit, but I'm not certain it's worth the effort. As is, I can fit a 12 oz. bottle and a 22 oz. bottle into the tube, so maybe I'll just use the tube to carry them, and if I am really worried about range (say on a ride to Deadhorse), I'll strap the 33 oz. bottle to the top of my Pelican cases, giving me almost a half gallon of extra gas.
Labels:
Accessories,
DIY
Location:
Anchorage, AK 99516, USA
Monday, April 2, 2012
LED Light Replacements
After completing the electrical system upgrades, I replaced the 55W halogen bulbs in the fog lights with LED H3 replacement bulbs and I replaced the tail lights with LED motorcycle tail light replacement bulbs, both from superbrightleds.com. I was a little nervous about replacing the bulbs, since I have seen mixed reviews of LED replacement bulbs at various places on-line. However, while I have yet to get the bike on the road (my driveway is still mostly covered in snow and slush), I am impressed with how the bulbs appear in my garage:
Since there are two bulbs in the tail light on my V-Strom, I replaced one bulb with the LED, then started the bike. The LED actually looked brighter than the OEM incandescent bulb, so I turned off the bike and swapped the second bulb as well, then started the bike again. Some of the reviews I have read suggest that the LED creates a bright point-source in the tail light lens, but that it doesn't illuminate the entire lens the way an incandescent bulb does. To avoid this problem, I bought the LED replacement bulbs that contain 19 LEDs to provide the red brake light and 6 white LEDs to illuminate the license plate. On the Strom, the 6 white LEDs won't reach the plate, since the bulb is in a sealed lens that is isolated from the plate. However, I was hoping that the white LEDs might help light up the rest of the lens, and from what I can see, they do.
I was similarly impressed with the H3 fog light replacement bulbs. Although they don't seem to light up the road ahead like the halogen H3 bulbs do, they are more than bright enough to make me more visible to other drivers on the road, which truthfully, is all I was really looking for. The stock headlights on the V-Strom light up the road *at least* as well as the lights on any other vehicle I've ever driven. The problem I was trying to solve, however, is that motorcycle headlights are so close together than most car drivers, used to seeing bulbs that are close to five feet apart, think that the motorcycle is farther away than it really is. By adding lights well away from the headlights, other drivers now see a triangle of lights, and it is much easier to judge distances, theoretically making it less likely to be cut off by a driver who doesn't realize how close you really are. For that purpose, the LED H3 replacement lamps seem to be more than bright enough.
All in all, I am pretty happy with the LED replacements, and I am very happy to have cut my electrical budget by roughly 115W (110W fog lights + 8W tail lights - ((2 x 0.65A) X 12v) fog lights - ((2 x 0.075A) * 12V) tail lights). I should now have plenty of electrical power to run fog lights, heated grips and the motorcycle's systems without discharging my battery.
Since there are two bulbs in the tail light on my V-Strom, I replaced one bulb with the LED, then started the bike. The LED actually looked brighter than the OEM incandescent bulb, so I turned off the bike and swapped the second bulb as well, then started the bike again. Some of the reviews I have read suggest that the LED creates a bright point-source in the tail light lens, but that it doesn't illuminate the entire lens the way an incandescent bulb does. To avoid this problem, I bought the LED replacement bulbs that contain 19 LEDs to provide the red brake light and 6 white LEDs to illuminate the license plate. On the Strom, the 6 white LEDs won't reach the plate, since the bulb is in a sealed lens that is isolated from the plate. However, I was hoping that the white LEDs might help light up the rest of the lens, and from what I can see, they do.
I was similarly impressed with the H3 fog light replacement bulbs. Although they don't seem to light up the road ahead like the halogen H3 bulbs do, they are more than bright enough to make me more visible to other drivers on the road, which truthfully, is all I was really looking for. The stock headlights on the V-Strom light up the road *at least* as well as the lights on any other vehicle I've ever driven. The problem I was trying to solve, however, is that motorcycle headlights are so close together than most car drivers, used to seeing bulbs that are close to five feet apart, think that the motorcycle is farther away than it really is. By adding lights well away from the headlights, other drivers now see a triangle of lights, and it is much easier to judge distances, theoretically making it less likely to be cut off by a driver who doesn't realize how close you really are. For that purpose, the LED H3 replacement lamps seem to be more than bright enough.
All in all, I am pretty happy with the LED replacements, and I am very happy to have cut my electrical budget by roughly 115W (110W fog lights + 8W tail lights - ((2 x 0.65A) X 12v) fog lights - ((2 x 0.075A) * 12V) tail lights). I should now have plenty of electrical power to run fog lights, heated grips and the motorcycle's systems without discharging my battery.
Thursday, March 29, 2012
SW-Motech Skidplate
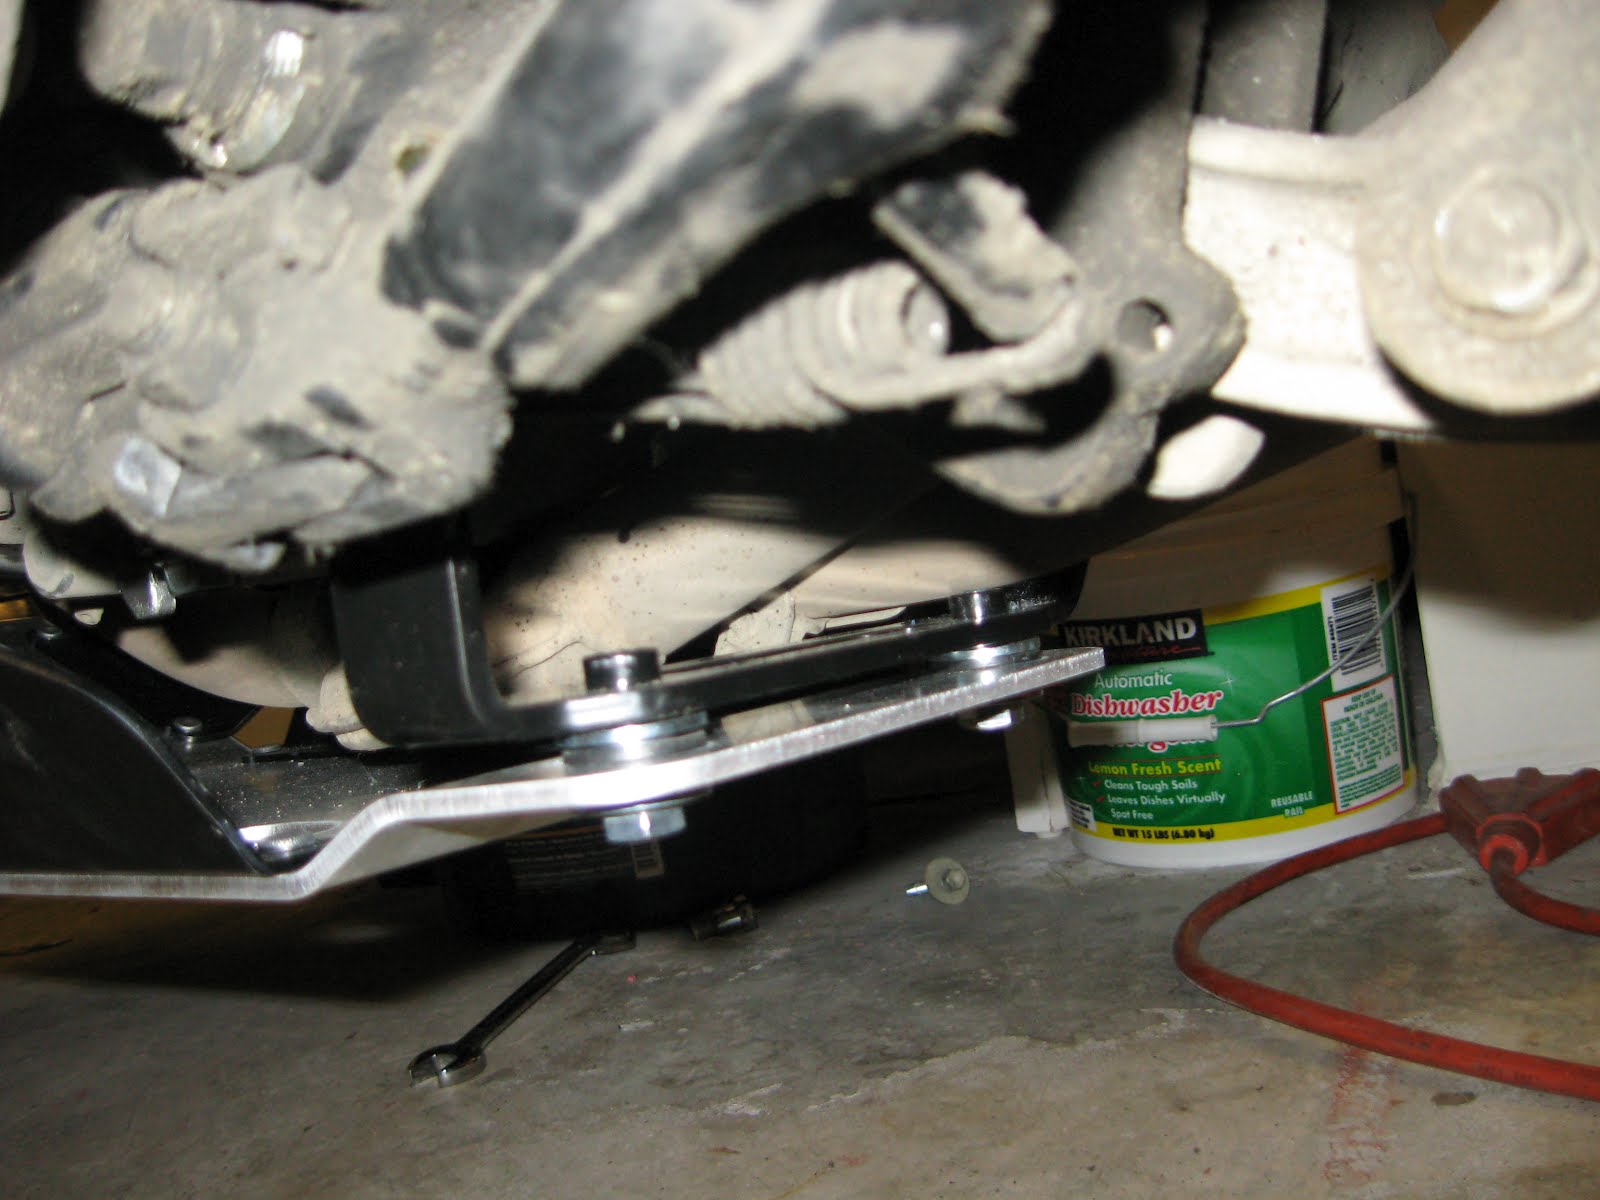
Now that the electrical work is done, I moved on to the oil change and SW-Motech Skidplate. Like pretty much all of the other SW-Motech gear I've installed on the bike, the skidplate is pretty easy to install, although the instructions leave a lot of the process for you to figure out. The exploded drawings are great, but the text is, ahem, minimal at best. Here's how I installed the skidplate.
I started by installing the rubber grommets in the skidplate. I presume they are being used as vibration isolators or shock mounts. Then I looked at the parts drawing trying to find the two 12mm washers that SW-Motech says should go over the bolts that hold the rear bracket to the bike. I couldn't find them, so I organized all the parts on a table in the garage. Nope, still can't find them. Then (finally!) I noticed the fine print on the drawing that says, "Original parts." Oh... <sheepish>
The next step is to remove the two bolts that hold the kickstand to the frame. Hey, wait a minute...how will the bike stay upright if the kickstand is removed? Okay, jack the bike up, and then remove the two bolts that hold the kickstand to the frame. By the way, those bolts are TIGHT; you will either need a really long-handled wrench or a cheater bar to break them loose.
The other side of the bracket attaches to the exhaust pipe hangar, just below the rear brake pedal. Unlike the kickstand attach bolts, the exhaust pipe hangar is really simple to remove.
Once all the kickstand and exhaust pipe hangar bolts have been removed, take the time to clean up the frame where the skidplate bracket will attach. The bottom of my Wee-Strom, at least, was caked with grime. If you mount the bracket without cleaning the frame first, you'll grit will grind away at the frame and the bracket.
Here's photo of the bracket hanging from the kickstand mounts. The silver bar on the top left of the photo is the shifter; the odd-shaped black lump on the lower left is the kickstand.
Here's the other side of the bike, with the bracket attached to the exhaust hangar.
Put a little blue (medium) Locktite on the threads of the bolts, reinstall the kickstand, and tighten up all three bolts. Unlike the SW-Motech Evo side carrier racks, you can tighten these bolts up before continuing the installation.
There are two little metal pieces that look kind of like washers, only with small protrusions on each side (see the left photo above). Notice that one side is smaller in diameter than the other. Insert the smaller side into the rubber grommet in the front of the skidplate, leaving the wider diameter side pointing forward. The metal protrusion will fit into the plastic clamp holding the two sides of the SW-Motech crash bars together.
There is a similar washer-like piece that fits on the rear of the skidplate, except that it only has a protrusion on one side. Again, fit that protrusion into the rubber grommet.
Fit the two smaller bolts through the rear of the skidplate, through the metal washer-like pieces, and through the clamp on the crash bars. Install the nylock washers on the other side of the clamp, and tighten the bolts enough to hold the skidplate in position, but don't clamp everything down yet.
Now, take the two last bolts and the two last washers, and fit them through the rubber grommets and metal washer-things at the rear of the skidplate. Again, I used a little blue Locktite to keep the bolts from working loose while riding. If you need to adjust the positioning, you can rotate the crash bar clamp to move the skidplate forwards or backwards so that the rear bolts line up with the bracket. Then, once everything you've got everything lined up, tighten up the two rear bolts and the two front bolts.
Here's the completed install.
A couple of comments about the skidplate, now that I've got it installed: on the plus side, it looks very sturdy and very robust. I wish the Wee had a little more ground clearance, but the skidplate should help minimize the problems with clearance, since I would have to hit a rock or a stump pretty hard to damage the oil cooler or exhaust headers with the skidplate installed. On the negative side, SW-Moetch seems to have left a lot of empty space under the oil filter, oil pan and front of the headers, which only makes the ground clearance worse. The plumbing for the exhaust pipe sits a little lower than I expected where the rear cylinder headers join with the forward cylinder headers, and the skidplate has to be even lower than that. I suspect SW-Motech wanted to keep the skidplate as smooth as possible to allow the bike to slide over rocks, stumps and/or logs, but I still wish the front of the skidplate was fit a little closer to the engine. I guess you can always use the extra space to carry tools or water though!
I started by installing the rubber grommets in the skidplate. I presume they are being used as vibration isolators or shock mounts. Then I looked at the parts drawing trying to find the two 12mm washers that SW-Motech says should go over the bolts that hold the rear bracket to the bike. I couldn't find them, so I organized all the parts on a table in the garage. Nope, still can't find them. Then (finally!) I noticed the fine print on the drawing that says, "Original parts." Oh... <sheepish>
The next step is to remove the two bolts that hold the kickstand to the frame. Hey, wait a minute...how will the bike stay upright if the kickstand is removed? Okay, jack the bike up, and then remove the two bolts that hold the kickstand to the frame. By the way, those bolts are TIGHT; you will either need a really long-handled wrench or a cheater bar to break them loose.
The other side of the bracket attaches to the exhaust pipe hangar, just below the rear brake pedal. Unlike the kickstand attach bolts, the exhaust pipe hangar is really simple to remove.
Once all the kickstand and exhaust pipe hangar bolts have been removed, take the time to clean up the frame where the skidplate bracket will attach. The bottom of my Wee-Strom, at least, was caked with grime. If you mount the bracket without cleaning the frame first, you'll grit will grind away at the frame and the bracket.
Here's photo of the bracket hanging from the kickstand mounts. The silver bar on the top left of the photo is the shifter; the odd-shaped black lump on the lower left is the kickstand.
Here's the other side of the bike, with the bracket attached to the exhaust hangar.
Put a little blue (medium) Locktite on the threads of the bolts, reinstall the kickstand, and tighten up all three bolts. Unlike the SW-Motech Evo side carrier racks, you can tighten these bolts up before continuing the installation.
There are two little metal pieces that look kind of like washers, only with small protrusions on each side (see the left photo above). Notice that one side is smaller in diameter than the other. Insert the smaller side into the rubber grommet in the front of the skidplate, leaving the wider diameter side pointing forward. The metal protrusion will fit into the plastic clamp holding the two sides of the SW-Motech crash bars together.
There is a similar washer-like piece that fits on the rear of the skidplate, except that it only has a protrusion on one side. Again, fit that protrusion into the rubber grommet.
Fit the two smaller bolts through the rear of the skidplate, through the metal washer-like pieces, and through the clamp on the crash bars. Install the nylock washers on the other side of the clamp, and tighten the bolts enough to hold the skidplate in position, but don't clamp everything down yet.
Now, take the two last bolts and the two last washers, and fit them through the rubber grommets and metal washer-things at the rear of the skidplate. Again, I used a little blue Locktite to keep the bolts from working loose while riding. If you need to adjust the positioning, you can rotate the crash bar clamp to move the skidplate forwards or backwards so that the rear bolts line up with the bracket. Then, once everything you've got everything lined up, tighten up the two rear bolts and the two front bolts.
Here's the completed install.
A couple of comments about the skidplate, now that I've got it installed: on the plus side, it looks very sturdy and very robust. I wish the Wee had a little more ground clearance, but the skidplate should help minimize the problems with clearance, since I would have to hit a rock or a stump pretty hard to damage the oil cooler or exhaust headers with the skidplate installed. On the negative side, SW-Moetch seems to have left a lot of empty space under the oil filter, oil pan and front of the headers, which only makes the ground clearance worse. The plumbing for the exhaust pipe sits a little lower than I expected where the rear cylinder headers join with the forward cylinder headers, and the skidplate has to be even lower than that. I suspect SW-Motech wanted to keep the skidplate as smooth as possible to allow the bike to slide over rocks, stumps and/or logs, but I still wish the front of the skidplate was fit a little closer to the engine. I guess you can always use the extra space to carry tools or water though!
Electrical System Upgrades, Part 3
This section could also be titled, "Will I Ever Get To, You Know, RIDE This Motorcycle Again?!?!" I've been working on the Wee for over a month, now. The gas tank is sitting in a corner of my garage. The fairing trim pieces, mounting hardware and other assorted odd ends are sitting on a small table in the garage that my daughter no longer has room for in her bedroom. Tools are scattered everywhere, and the Wee looks naked with the gas tank, trim and seat removed.
Fortunately, there is a light at the end of the tunnel. After a month of work, almost everything is wired up. I've got both the +12V and ground terminal strips installed, the main electrical accessories relay is installed and connected, the fog light relay is installed and connected to the Autoswitch (Note: looks like Aerostich no longer sells the model I bought; the link goes to the new version of the switch) and the fog lights are connected to both the relay (for power) and to ground. The only step left is installing the Autoswitch indicator light and connecting the trigger wire.
Here's a photo of the Autoswitch, just behind the battery. Route the wires to the positive voltage source (the +12V terminal strip, in my installation), to ground, to the high-beam power lead, and route the LED indicator to the fairing.
In this photo, I am wrapping the Autoswitch trigger wire and the indicator wires to the OEM wire bundle with spiral wrap.
The trigger wire has to be connected to the high-beam power lead. However, there are three wires going to the headlights/high-beam lights on the DL650. To find out which wire I needed to tap into, I disconnected the connector from the light bulbs and used a multimeter to find the ground wire (it was the black wire with the white stripe). Then, I turned the ignition key to the on position and used the multimeter to find which of the remaining wires had power at all times (the yellow wire) and when the high-beam switch was in the "on" position (the solid black wire). The solid black wire, then, was the wire that I attached the vampire tap to.
After getting the trigger wire hooked up, and installing the indicator LED in the fairing, I reinstalled the gas tank, re-attached the front fairings and, for the first time in over a month, heard that sweet, sweet V-Twin sound again :) Okay...the bike still runs. Good! Do the heated grips work? Yep! All right...if I'm really, really careful with the multimeter, I should see 12V from the accessory outlet...yep, that works. Woohoo! So far, so good. Does the Autoswitch turn on my fog lights?
@$#^$^#%&*@!!!!!!!!!
Nope. I trigger the high-beam switch for one second, but I don't get the indication that it's turning on power to the fog lights, and the fog lights are dark. Nuts...I knew things were going too well! Either I wired something up incorrectly, the Autoswitch is defective or riding last summer with fog lights hung from my crash bars broke the filaments in the bulbs. I've got LEDs coming in the mail to replace the halogen fog light bulbs; they should be here today (Edit: they arrived, I have installed them; see the review here). I'll connect them before I start ripping wiring apart, in the hopes that it's just bad bulbs.
Here's a shot of the installed SW-Motech 12V accessory outlet (and the SW-Motech flush mount mounting bracket).
Still to come: troubleshooting the fog lights, replacing the worn OEM Bridgestone Trailwing Tire with a Shinko 705 and installing the SW-Motech skid plate...after I change the oil and coolant.
EDIT: The fog lights work fine; the Autoswitch just doesn't work the way I thought it did. First, hitting the button to flash the high-beams won't trigger the Autoswitch. I don't understand why -- it would seem to me that if the high-beam bulb gets electricity, that should be sufficient to trigger the Autoswitch -- but okay, whatever. Second, the Autoswitch instructions state that you turn on the high-beams for one second, then turn them off to turn on the fog lights. Huh-uh. That doesn't work. Rock the high-beam switch on and then off. When you do that, you will see the LED start flashing. Now rock the high-beam switch on and then off again. That will turn on the fog lights. Do the same thing to turn the fog lights off again. I'm not sure why it doesn't work the way the instructions say it should, but at least it works. I'm happy :)
Fortunately, there is a light at the end of the tunnel. After a month of work, almost everything is wired up. I've got both the +12V and ground terminal strips installed, the main electrical accessories relay is installed and connected, the fog light relay is installed and connected to the Autoswitch (Note: looks like Aerostich no longer sells the model I bought; the link goes to the new version of the switch) and the fog lights are connected to both the relay (for power) and to ground. The only step left is installing the Autoswitch indicator light and connecting the trigger wire.
Here's a photo of the Autoswitch, just behind the battery. Route the wires to the positive voltage source (the +12V terminal strip, in my installation), to ground, to the high-beam power lead, and route the LED indicator to the fairing.
In this photo, I am wrapping the Autoswitch trigger wire and the indicator wires to the OEM wire bundle with spiral wrap.
The trigger wire has to be connected to the high-beam power lead. However, there are three wires going to the headlights/high-beam lights on the DL650. To find out which wire I needed to tap into, I disconnected the connector from the light bulbs and used a multimeter to find the ground wire (it was the black wire with the white stripe). Then, I turned the ignition key to the on position and used the multimeter to find which of the remaining wires had power at all times (the yellow wire) and when the high-beam switch was in the "on" position (the solid black wire). The solid black wire, then, was the wire that I attached the vampire tap to.
After getting the trigger wire hooked up, and installing the indicator LED in the fairing, I reinstalled the gas tank, re-attached the front fairings and, for the first time in over a month, heard that sweet, sweet V-Twin sound again :) Okay...the bike still runs. Good! Do the heated grips work? Yep! All right...if I'm really, really careful with the multimeter, I should see 12V from the accessory outlet...yep, that works. Woohoo! So far, so good. Does the Autoswitch turn on my fog lights?
@$#^$^#%&*@!!!!!!!!!
Nope. I trigger the high-beam switch for one second, but I don't get the indication that it's turning on power to the fog lights, and the fog lights are dark. Nuts...I knew things were going too well! Either I wired something up incorrectly, the Autoswitch is defective or riding last summer with fog lights hung from my crash bars broke the filaments in the bulbs. I've got LEDs coming in the mail to replace the halogen fog light bulbs; they should be here today (Edit: they arrived, I have installed them; see the review here). I'll connect them before I start ripping wiring apart, in the hopes that it's just bad bulbs.
Here's a shot of the installed SW-Motech 12V accessory outlet (and the SW-Motech flush mount mounting bracket).
Still to come: troubleshooting the fog lights, replacing the worn OEM Bridgestone Trailwing Tire with a Shinko 705 and installing the SW-Motech skid plate...after I change the oil and coolant.
EDIT: The fog lights work fine; the Autoswitch just doesn't work the way I thought it did. First, hitting the button to flash the high-beams won't trigger the Autoswitch. I don't understand why -- it would seem to me that if the high-beam bulb gets electricity, that should be sufficient to trigger the Autoswitch -- but okay, whatever. Second, the Autoswitch instructions state that you turn on the high-beams for one second, then turn them off to turn on the fog lights. Huh-uh. That doesn't work. Rock the high-beam switch on and then off. When you do that, you will see the LED start flashing. Now rock the high-beam switch on and then off again. That will turn on the fog lights. Do the same thing to turn the fog lights off again. I'm not sure why it doesn't work the way the instructions say it should, but at least it works. I'm happy :)
Thursday, March 15, 2012
Wiring Up the Gadgets
In my last post, I discussed some of the new goodies I was installing on my motorcycle. However, I pretty much avoided the topic of the electrical work necessary to get some of the devices working. In particular, heated grips and a 12V power outlet don't do much good if they aren't connected to the bike's electrical system. Here's how I did it.
First, I decided to install terminal strips so that it would be relatively easy to install new devices. I purchased an assortment of terminal strips, from 4-12 connections per strip. Unfortunately, there's not a lot of space around the engine, so I ended up using the 4-outlet terminal strips -- one for the positive bus (shown) and one for the ground bus. The next question is where to install the busses? I noticed that there is quite a lot of space behind the rear quarter panels, so that is where I decided to install the positive bus, the extra wiring and the heat controller circuitry. Pulling the left-hand, rear panel is pretty straightforward, although it required removing the SW-Motech side cases and the OEM rear luggage rack. Once the body panel was removed, I found a suitable location to mount the terminal strip. There is a cross-brace on the frame that is already drilled with two holes. Unfortunately, they are too large diameter and too far apart to hold my terminal strip, so I had to drill two 1/8 inch holes, then I pop-riveted the terminal strip to the frame.
Next, I had to find a place to mount the relay that turns on 12V power to the positive bus. I picked up a Bosch 40A automotive relay at the local electronics parts dealer and a wiring harness for the relay. Again, in hindsight, the wiring harness may not have been a great idea; it doubles the size of the relay and I still have to crimp connectors to the wires whereas I could have simply crimped a blade connector to the wiring and kept the size a little smaller. However, near the rear of the frame, there is a plastic fender that separates the battery and storage compartment from the wheel well. I drilled a 1/8 inch hold in the fender, smeared some liquid electrical tape (basically, a rubberized glue) on both the inside and outside of the fender, and pop riveted the relay to the fender.
Route the wires from the heated grips and 12V outlet around the triple clamps...
...under the frame and alongside the existing wire bundles between the frame and the engine. To keep things neat and to protect the wires, I wrapped them in spiral wrap.
Connect the positive lead TO the terminal strip to the battery, then route it under the frame to the terminal strip. Again, to keep things neat and to protect the wire, I wrapped it in spiral wrap.
To be continued...
First, I decided to install terminal strips so that it would be relatively easy to install new devices. I purchased an assortment of terminal strips, from 4-12 connections per strip. Unfortunately, there's not a lot of space around the engine, so I ended up using the 4-outlet terminal strips -- one for the positive bus (shown) and one for the ground bus. The next question is where to install the busses? I noticed that there is quite a lot of space behind the rear quarter panels, so that is where I decided to install the positive bus, the extra wiring and the heat controller circuitry. Pulling the left-hand, rear panel is pretty straightforward, although it required removing the SW-Motech side cases and the OEM rear luggage rack. Once the body panel was removed, I found a suitable location to mount the terminal strip. There is a cross-brace on the frame that is already drilled with two holes. Unfortunately, they are too large diameter and too far apart to hold my terminal strip, so I had to drill two 1/8 inch holes, then I pop-riveted the terminal strip to the frame.
Next, I had to find a place to mount the relay that turns on 12V power to the positive bus. I picked up a Bosch 40A automotive relay at the local electronics parts dealer and a wiring harness for the relay. Again, in hindsight, the wiring harness may not have been a great idea; it doubles the size of the relay and I still have to crimp connectors to the wires whereas I could have simply crimped a blade connector to the wiring and kept the size a little smaller. However, near the rear of the frame, there is a plastic fender that separates the battery and storage compartment from the wheel well. I drilled a 1/8 inch hold in the fender, smeared some liquid electrical tape (basically, a rubberized glue) on both the inside and outside of the fender, and pop riveted the relay to the fender.
Route the wires from the heated grips and 12V outlet around the triple clamps...
...under the frame and alongside the existing wire bundles between the frame and the engine. To keep things neat and to protect the wires, I wrapped them in spiral wrap.
Connect the positive lead TO the terminal strip to the battery, then route it under the frame to the terminal strip. Again, to keep things neat and to protect the wire, I wrapped it in spiral wrap.
To be continued...
Thursday, March 8, 2012
Finally Installing Heated Grips Among Other Odds and Ends
Last winter, I wrote about some intended electrical upgrades. Summer arrived before I had the opportunity to install the fog lights or the terminal strips for future electrical upgrades. So, I'm revisiting that project this year. Also, my wonderful, sweet, loving wife bought me a set of Oxfords Heated Grips for Christmas (thank you, honey!) and I am installing them, too. Here's how you do it.
First, remove the bar end weights from the handlebars. Don't pull the screw all the way out -- just loosen it up. Inside the handlebars, there are a series of washers, spacers and rubber bushings. The screw pulls on the rubber bushings, causing them to expand and press against the handlebars, holding them in place. If you pull the screw out of the bar end weights, the bushings will get stuck in the handlebars. It's possible to get it out, but it's not any fun (ask me how I know...).
Here's the entire bar end weight assembly after being removed from the handlebar.
Next, you have to remove the stock grips. This was arguably the hardest part for me. It's not physically difficult to do; I just couldn't bring myself to cut the grips. I found out later that you can use compressed air to blow the grips off. Wish I'd read that before cutting my grips off :rolleyes:
The left side is pretty straightforward. Use some sandpaper to remove the contact cement from the handlebars after removing the grip. The throttle side, however, is a bit more difficult. The Oxfords grips are really stiff, and need the throttle tube to be perfectly smooth. Unfortunately, Suzuki created the throttle tube with flanges at each end to help hold the grip on the throttle tube...
...and ridges along the length of the throttle tube to keep the grip from slipping when you grab a fistful of throttle (not that you or I would ever do anything like that!)
To solve this problem, grab a file and get to work on those ridges and flanges. After getting them reasonably smooth, use some sandpaper to finish the job. Oxfords recommends checking the inside of the grips for flash from the manufacturing process. My right hand grip had some flash in it, but the left side was okay. While I'm not terribly impressed that Oxfords couldn't clean up their grips before shipping them out, it's easy enough to do yourself with a small file. It took me all of maybe two minutes to do.
Before installing the grips, it is critically important to spend a while finding the best mounting orientation. You don't want the power wires to foul your brake, clutch or fairing, so spend a couple of minutes trying different positions on the throttle tube and handlebar. Make sure you take the time to verify that you still have clearance while rotating the throttle. You *DON'T* want to find out that your brake doesn't clear the power wires at highway speeds!
Once you are satisfied with the positioning, use the included high-temp super glue (!) to glue the grips in place. If anyone at Oxfords happens to stumble across this page, super glue, IMHO, is an exceptionally poor choice since you do not get nearly enough time to position the grips before the glue sets. Seriously, was there *nothing* that you could find that was flexible enough and heat resistant enough (high temp silicone, maybe?) for this purpose? </rant> Anyway, back to the install. First, coat the inside of the grip -- NOT the handlebar!!! -- with super glue, then QUICKLY slide the grips on the handlebar or throttle tube. You have to work fast! This stuff sets very, very quickly, and once it grabs, you are DONE. Again, ask me how I know (sigh)
Congratulations! The hard part is done. Now, it is time to install the heat controller. Oxfords had an ingenious solutions for affixing the controller to the somewhat crowded real estate on a motorcycle's handlebars: mount the controller on a metal bracket that is drilled to match the mounting holes on the left-hand rear view mirror on some motorcycles. Simple, right?
Unfortunatley, on V-Stroms -- or at least on my K9 DL650 -- there's a snag. The left-hand rear view mirror mount only has one bolt, but the Oxford bracket requires an upper and lower mounting bolt. It would match the bolts on the right-hand side mount, but the metal bracket is cut to fit on the left hand side only, and honestly, I wouldn't want to let go with my throttle hand to change heat settings anyway. I was able to work around the problem by buying a conduit clamp at Lowe's and mounting the bracket to it. It took a little work with some pliers to match the holes in the clamp to the holes in the bracket, but I finally got them to mate up. Then, I wrapped the clamp in electrical tape (so the metal clamp wouldn't abrade the handlebars), and bolted the bracket to the clamp.
Here's the completed install:
One other problem I ran into: the diagram doesn't show it, but there should be an adhesive pad between the controller and the metal bracket. The bracket and controller are held together by two screws, but the pad acts as a shock absorber so that vibrations in the handlebars don't get transmitted to the electronics in the controller. Of course, I didn't see that until after I had already screwed the controller onto the bracket, requiring me to remove the screws, remove the controller, install the adhesive pad, then reinstall the screws. It's not a big deal, but by this point, the frustration level was mounting.
The only thing left to do at this point is the electrical wiring. However, I'm still working on several facets of that project, so..."To be continued" :)
First, remove the bar end weights from the handlebars. Don't pull the screw all the way out -- just loosen it up. Inside the handlebars, there are a series of washers, spacers and rubber bushings. The screw pulls on the rubber bushings, causing them to expand and press against the handlebars, holding them in place. If you pull the screw out of the bar end weights, the bushings will get stuck in the handlebars. It's possible to get it out, but it's not any fun (ask me how I know...).
Here's the entire bar end weight assembly after being removed from the handlebar.
Next, you have to remove the stock grips. This was arguably the hardest part for me. It's not physically difficult to do; I just couldn't bring myself to cut the grips. I found out later that you can use compressed air to blow the grips off. Wish I'd read that before cutting my grips off :rolleyes:
The left side is pretty straightforward. Use some sandpaper to remove the contact cement from the handlebars after removing the grip. The throttle side, however, is a bit more difficult. The Oxfords grips are really stiff, and need the throttle tube to be perfectly smooth. Unfortunately, Suzuki created the throttle tube with flanges at each end to help hold the grip on the throttle tube...
...and ridges along the length of the throttle tube to keep the grip from slipping when you grab a fistful of throttle (not that you or I would ever do anything like that!)
To solve this problem, grab a file and get to work on those ridges and flanges. After getting them reasonably smooth, use some sandpaper to finish the job. Oxfords recommends checking the inside of the grips for flash from the manufacturing process. My right hand grip had some flash in it, but the left side was okay. While I'm not terribly impressed that Oxfords couldn't clean up their grips before shipping them out, it's easy enough to do yourself with a small file. It took me all of maybe two minutes to do.
Before installing the grips, it is critically important to spend a while finding the best mounting orientation. You don't want the power wires to foul your brake, clutch or fairing, so spend a couple of minutes trying different positions on the throttle tube and handlebar. Make sure you take the time to verify that you still have clearance while rotating the throttle. You *DON'T* want to find out that your brake doesn't clear the power wires at highway speeds!
Once you are satisfied with the positioning, use the included high-temp super glue (!) to glue the grips in place. If anyone at Oxfords happens to stumble across this page, super glue, IMHO, is an exceptionally poor choice since you do not get nearly enough time to position the grips before the glue sets. Seriously, was there *nothing* that you could find that was flexible enough and heat resistant enough (high temp silicone, maybe?) for this purpose? </rant> Anyway, back to the install. First, coat the inside of the grip -- NOT the handlebar!!! -- with super glue, then QUICKLY slide the grips on the handlebar or throttle tube. You have to work fast! This stuff sets very, very quickly, and once it grabs, you are DONE. Again, ask me how I know (sigh)
Congratulations! The hard part is done. Now, it is time to install the heat controller. Oxfords had an ingenious solutions for affixing the controller to the somewhat crowded real estate on a motorcycle's handlebars: mount the controller on a metal bracket that is drilled to match the mounting holes on the left-hand rear view mirror on some motorcycles. Simple, right?
Unfortunatley, on V-Stroms -- or at least on my K9 DL650 -- there's a snag. The left-hand rear view mirror mount only has one bolt, but the Oxford bracket requires an upper and lower mounting bolt. It would match the bolts on the right-hand side mount, but the metal bracket is cut to fit on the left hand side only, and honestly, I wouldn't want to let go with my throttle hand to change heat settings anyway. I was able to work around the problem by buying a conduit clamp at Lowe's and mounting the bracket to it. It took a little work with some pliers to match the holes in the clamp to the holes in the bracket, but I finally got them to mate up. Then, I wrapped the clamp in electrical tape (so the metal clamp wouldn't abrade the handlebars), and bolted the bracket to the clamp.
Here's the completed install:
One other problem I ran into: the diagram doesn't show it, but there should be an adhesive pad between the controller and the metal bracket. The bracket and controller are held together by two screws, but the pad acts as a shock absorber so that vibrations in the handlebars don't get transmitted to the electronics in the controller. Of course, I didn't see that until after I had already screwed the controller onto the bracket, requiring me to remove the screws, remove the controller, install the adhesive pad, then reinstall the screws. It's not a big deal, but by this point, the frustration level was mounting.
The only thing left to do at this point is the electrical wiring. However, I'm still working on several facets of that project, so..."To be continued" :)
Subscribe to:
Posts (Atom)