It took ten days for the bars to get here (so much for UPS' 3-day shipping, but that's another story). When they arrived, sure enough, my bars had a scratch in the paint. You can see it in the photo on the right, at the top of the left-hand bar, near the bend where the bar begins to curve downwards. Can you see it?
How about a closer shot...over there on the far left...still don't see it?
 How about now? Yep, that's it. That tiny little scratch was all the damage there was. As I said over at Stromtrooper, consider it "factory distressed." :)
 Anyway, I unpacked the bars, set up a work table in the garage and got to work installing the bars, which was about a one hour job. It was pretty painless, and as others have said, the hardest part of the install is breaking loose the threadlock that Suzuki paints on the engine mount bolts. The bolts are allen-head bolts, so you'll need a 6mm allen head wrench, and a piece of pipe to use as a breaker bar, because unless you hail from Krypton, there's no way you're getting those suckers loose with a just four inch long allen wrench.
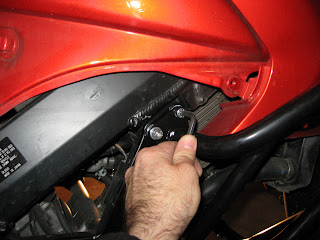
Step 1: remove the two allen bolts at the rear of the frame. In this photo, I have already removed the rear-most bolt, and am removing the next bolt. SW-Motech points out in the instruction sheet that you should be careful to only remove the bolts on one side of the engine at a time, because if you remove all eight bolts at the same time, the engine could shift in the frame. I started on the left-hand side of the bike, and only after fully installing the crash bar on this side (and tightening all four bolts) did I remove the bolts on the right hand side of the engine.
Step 2: you can get three of the four engine mount bolts loose without removing anything else, but to get access to the fourth engine mount bolt, you will have to remove this plastic trim piece (in black). It's held in place with a single allen bolt (shown in the picture) and two snaps inside the trim. Remove the allen bolt as shown, then wiggle the trim piece to pop the snaps loose. It's probably easier with the seat removed, but I was able to wiggle the trim piece loose with the seat still in place.
Step 3: now that the trim piece is removed, you can easily get access to the last two remaining bolts. Remove them. The engine will be resting on the large hex bolt at the apex of the "vee" in the frame trellis and the four bolts on the other side of the bike, so it's secure.
Step 4: the crash bars ship with all new bolts, washers and aluminum spacers. Six of the bolts will be 8mm in diameter, and will be the longest bolts in the kit. These are the three rear-most bolts on the frame. Two bolts will also be 8mm in diameter, but will be slightly shorter. These bolts go in the front hole of the crash bar. Slip a lock washer over the three longer 8mm bolts, then slide the bolts through the mounting holes in the crash bars. Then, slip the shorter 8mm bolt through the forward hole in the crash bars (no lock washer on this bolt, and the crash bar is slightly recessed for this bolt).
Step 5: if your bike is on its side stand during the install (as mine is), you'll need a way to keep the bolts from falling out of the crash bars while you maneuver the bars into position. I wrapped electrical tape over the bolts, which worked pretty well.
Step 6: slide the aluminum spacers over the bolts (on the opposite side of the crash bar mounting flanges) and apply Lock-tite to the threads...
Step 7: then maneuver the crash bars into position and twist all the bolts into place, finger tight.
Then tighten...
...all four bolts...
...to the torque values...
...given in your Suzuki service manual (or as tight as you can get them with a four inch long allen wrench, if you're like me, and don't have either a torque wrench with an allen head or a Suzuki service manual).
Step 8: slip the two shortest bolts through the clamp, lightly thread them into the nylock bolts (make sure the bolt heads are on the side of the clamp with the round indentations and the nuts are on the side of the clamp with the six-sided indentations), then slip the clamp over the crash bar, just above the oil cooler and in front of the cylinder.
Step 9: I'm cheating a bit here...duplicate steps 1-7 on the other side of the bike. Installation of the other crash bar is identical to this side, so I'm not going to write it up separately. After installing both crash bars, slide the clamp so that it is centered on both bars and tighten the bolts to lock the two sides of the crash bars together. Then, reinstall the trim pieces you removed earlier, and you're done!
 |
| The completed installation |


Thanks for the detailed write-up! I will be putting the same bars on my V-Strom as soon as it warms up a little in my garage.
ReplyDelete