Tuesday, May 28, 2013
XS750 Project -- Part 20: It's a Roller!!!
There is a quote attributed to Thomas Edison that I really like: "I have not failed. I've just found 10,000 ways that do not work. Taking a cue from Edison, I seem to have found 10,000 or so ideas, while converting an XS750 to a cafe racer, that do not work.
First, the awesome fuel filters I picked up at O'Reilly's auto don't fit between the fuel petcocks and the fuel manifold on the carbs. The outlet on the petcocks points towards the center of the bike, and therefore, the length of the fuel filters means that fuel will have to flow upwards to the carbs. Since the carbs are gravity fed, I'm not convinced that the fuel will actually make it to the carbs, especially when the tank is nearly empty. Consequently, I removed the filters and ran the fuel lines directly to the carbs. The petcocks already have fine mesh screens over the inlets. Yamaha obviously thought that would be enough filtration, so I'll go with their design.
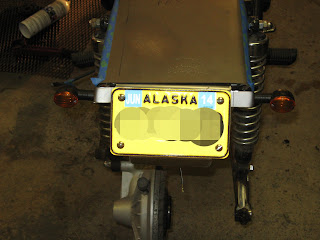
Second, once I installed the rear wheel, I found that the tail light/brake light/turn signal/license plate hangar rubs on the tire. As I was fabricating the part, I was concerned about clearance, and now that the rear tire is reinstalled, it looks like my concerns were well founded. Even with no load on the shocks, the license plate touches the rear tire. I'll have to find a way to point the plate upwards, rather than hanging it underneath the seat. On a positive note, I salvaged a thicker metal strip from the OEM license plate hangar that should work better for securing the tail lights. The tail light bracket I fabricated was a little flimsy; the OEM piece is much beefier. However, I'll have to ream the mounting holes a little bit to get the 10mm bolts on the turn signals to fit.
Third, after priming the fiberglass side panels, I sprayed them with several coats of Duplicolor "Stainless Steel" paint, then tried to put a layer of Duplicolor "Shadow" paint to match the effect I intend for the gas tank. Unfortunately, it doesn't seem like the Stainless Steel and Shadow paints are compatible. When I applied the Shadow paint over the Stainless Steel paint, the Shadow paint spotted, looking like snakeskin or fish scales. It could be a cool effect, if that's what I wanted, but...well...that isn't what I wanted ;) I ended up covering over the Shadow paint with more Stainless Steel, but that was a mistake, too. Today or tomorrow, I'll fix it properly by sanding off everything down to the primer and starting over.
And, of course, I have already written about my attempts to fabricate a gasket for the fuel tank filler opening...
...the front brake issues...
...the Emgo pod filters, and...
...the "Angel Eyes" turn signal/brake lights.
It can be frustrating to waste money on parts that you end up not using, not mention the hours (and hours...) spent fabricating pieces only to find out that your idea won't work, and you'll have to start all over again. However, that's just part of the process, and honestly, part of the fun. In fact, it's such a time-honored tradition, that engineers (the professional kind, not just us back-yard mechanics!) came up with a term for it:
Iteration.
And despite the setbacks, I have made some real, definitive, measureable progress on the bike over the Memorial Day weekend. As shown in the photo at the top of this blog entry, the XS750 is now a roller! After painting the frame this weekend, I reached a point where I could start putting pieces back ON the bike, instead of just taking pieces off. I installed the rear wheel, the rear brake, the electrical box...
...and the rear "fender," which made me very happy. Finally, it's starting to look like a motorcycle again instead of a collection of dusty scrap cluttering up my garage :) The best part is, now that I'm starting to see my vision materialize, I'm getting stoked to finish up the project! I want to have it ready to run in...25 days?...something like that, anyway. Last week, I wasn't certain I would make my deadline, but now, I think that maybe I can :)
Wish me luck!
Thursday, May 16, 2013
XS750 Project, Part 19 -- Some Welding and More Fiberglass Work
I obviously need practice, but it will do for now (and yes, I used the angle grinder to clean it up a
I also tried to revisit the RTV silicone fuel cap gasket. I think we can add this...:
...to the list of ideas that seemed better in my head than they were in reality. Not sure what I'll try next.
Finally, I am trying to finish up the fiberglass side panels, so tonight, I mixed up another batch of polyester resin and got to work patching up areas that were a little thin from sanding, where the fiberglass didn't follow compound curves quite as well as I had hoped, and where air bubbles had left voids:
Unfortunately, my baseboard heaters were leaking, so I had to turn off the heat to my garage last weekend. I haven't fixed the heat yet, but c'mon, it's the middle of May, so it should be warm enough anyway...right?
Yeah, no. When I left for work this morning, it was 31 degrees (F), and snowing!!!. To get the garage warm enough for the polyester resin to cure, I brought a couple of 500W halogen lights over near my work bench. I'd rather have the baseboard heat, but these will do for now.
Sunday, May 12, 2013
XS750 Restoration, Part 18 -- Stripping in the Driveway
One of the milestones on my project plan that must be completed before most of the other milestones can be met is stripping the gas tank. I've been at work on that particular milestone for months now, and to tell the truth, I'm really getting tired of looking at an ALMOST stripped gas tank every time I walk out into the garage :) So, having some extra time today, I dragged the tank out into the driveway, and starting stripping (paint, that is). I bought some chemical stripper and a "toothbrush" (well, it looks like one, anyway) with steel bristles at O'Reilley's the other day, so I liberally covered the gas tank with the stripper, let it sit for 15 minutes or so, then started scrubbing on the tank with the brush. I made some progress, but not as much as I expected. I applied more stripper, let it sit, and scrubbed again.
And again...
And yet again.
I was making progress, but after what I had read on-line about the stuff I bought, I was honestly kind of disappointed with the chemical stripper. It just didn't seem to be dissolving the paint very well.
That's when I noticed that the can I bought said, "Adhesive and Decal Remover" (facepalm). The cans look identical, and they are made by the same company, but this was not what I needed. I wiped as much of the stuff off of the tank as I could, and tried pouring some MEK that I had from another project a few years back on the gas tank. It worked about as well as the decal and adhesive remover. I grabbed my cordless drill and wire wheel, and started scrubbing at the tank. I made some progress, but by the time I had drained both batteries, I still had a lot of old paint left on the tank. Finally, I decided to do it right, so I went back into town and bought the right stuff to use on my tank, and what a difference THAT made! The chemical stripper and wire "toothbrush" cleaned almost all of the paint off of the tank in about an hour. There are still a few places inside the "tunnel" and in crevices around the gas cap hinge and lock where I still have a bit of paint to clean out, but the tank is easily 90+% done, now.
I also made some progress on the license plate, tail light and turn signal hangar, which I fabricated from two pieces of mild steel sheet. To make the part, I started by tracing a license plate onto the steel sheet. Then, I traced the outline of the taillight above the license plate. Next, I measured a one inch high by...ummm...eleven inches, I think?...strip of steel, and added a tab, seven inches wide and about three inches high, to mount the completed hangar onto the seat pan. I cut the pieces out of the steel sheet with my angle grinder (quickly becoming one of my favorite tools!), marked the holes to mount the license plate, and drilled the bolt holes. I bent all the pieces to shape over a 1x1 block of wood, and this is the result. I'm reasonably happy with it, although I think I might need to add some gussets on the tabs that hold the turn signals. The steel is thin enough that those tabs bend pretty easily.
Edit: Don't try what I describe next!!! It doesn't work, and the RTV will plug up the vent in the fuel cap, which will cause your engine to die on you due to fuel starvation!
Emboldened by my success with the license plate/tail light hangar, and still really needing a gasket to seal between the gas cap and the gas tank filler opening, I decided to try to form a gasket out of RTV silicone. I've looked on-line, and the gas cap gaskets are not available as a stand-alone item; you can only get one if you buy the entire gas cap. I mean, how hard could it be...right?
So, I cut a plastic shopping bag into a a flat sheet of plastic, folded it until it was just a bit larger than the filler opening in the gas tank, duct taped it over the filler opening, squirted a huge glob of silicone onto the plastic, carefully placed the gas cap onto the blob of silicone, duct taped it in place and let it sit overnight. I checked it the next day after work...but it wasn't fully cured yet, so I put the cap back in place and gave it a couple more days...
Each step of the process...:
...and the final result: Ugh...that looks like crap! I think the steel cap would seal better than that, lol! I might try again, using considerably less silicone, or I might just go to Alaska Rubber and see if they have a sheet of rubber that I could cut to fit. We'll see.
While I was at O'Reilley's buying decal remover (sigh...), I found a couple of very nice looking chrome-and-glass fuel filters. I connected the filters up to the 5/16" fuel line I bought the other day, and connected the other end of the fuel line up to the fuel petcocks. I then used the old 1/4" braided steel fuel lines I bought last fall to connect the vacuum input on the petcocks. Looks pretty sharp; can't wait to get the tank painted and reinstalled on the bike so I can hook the lines up to the carbs!
And that's the progress on the XS750 cafe racer project tonight. Hopefully, I'll get a chance to revisit the front brakes and can start getting the frame and the tank painted so I can start putting pieces back together soon! 'Til then, keep the rubber side down!