There is a quote attributed to Thomas Edison that I really like: "I have not failed. I've just found 10,000 ways that do not work. Taking a cue from Edison, I seem to have found 10,000 or so ideas, while converting an XS750 to a cafe racer, that do not work.

First, the awesome fuel filters I picked up at O'Reilly's auto don't fit between the fuel petcocks and the fuel manifold on the carbs. The outlet on the petcocks points towards the center of the bike, and therefore, the length of the fuel filters means that fuel will have to flow upwards to the carbs. Since the carbs are gravity fed, I'm not convinced that the fuel will actually make it to the carbs, especially when the tank is nearly empty. Consequently, I removed the filters and ran the fuel lines directly to the carbs. The petcocks already have fine mesh screens over the inlets. Yamaha obviously thought that would be enough filtration, so I'll go with their design.

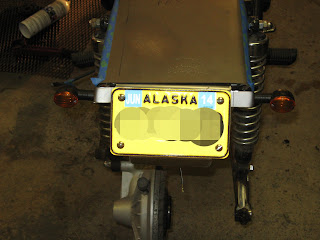
Second, once I installed the rear wheel, I found that the tail light/brake light/turn signal/license plate hangar rubs on the tire. As I was fabricating the part, I was concerned about clearance, and now that the rear tire is reinstalled, it looks like my concerns were well founded. Even with no load on the shocks, the license plate touches the rear tire. I'll have to find a way to point the plate upwards, rather than hanging it underneath the seat. On a positive note, I salvaged a thicker metal strip from the OEM license plate hangar that should work better for securing the tail lights. The tail light bracket I fabricated was a little flimsy; the OEM piece is much beefier. However, I'll have to ream the mounting holes a little bit to get the 10mm bolts on the turn signals to fit.

Third, after priming the fiberglass side panels, I sprayed them with several coats of Duplicolor "Stainless Steel" paint, then tried to put a layer of Duplicolor "Shadow" paint to match the effect I intend for the gas tank. Unfortunately, it doesn't seem like the Stainless Steel and Shadow paints are compatible. When I applied the Shadow paint over the Stainless Steel paint, the Shadow paint spotted, looking like snakeskin or fish scales. It could be a cool effect, if that's what I wanted, but...well...that isn't what I wanted ;) I ended up covering over the Shadow paint with more Stainless Steel, but that was a mistake, too. Today or tomorrow, I'll fix it properly by sanding off everything down to the primer and starting over.

And, of course, I have already written about my attempts to fabricate a gasket for the fuel tank filler opening...

...the front brake issues...

...the Emgo pod filters, and...

...the "Angel Eyes" turn signal/brake lights.
It can be frustrating to waste money on parts that you end up not using, not mention the hours (and hours...) spent fabricating pieces only to find out that your idea won't work, and you'll have to start all over again. However, that's just part of the process, and honestly, part of the fun. In fact, it's such a time-honored tradition, that engineers (the professional kind, not just us back-yard mechanics!) came up with a term for it:
Iteration.
And despite the setbacks, I have made some real, definitive, measureable progress on the bike over the Memorial Day weekend. As shown in the photo at the top of this blog entry, the XS750 is now a roller! After painting the frame this weekend, I reached a point where I could start putting pieces back ON the bike, instead of just taking pieces off. I installed the rear wheel, the rear brake, the electrical box...

...and the rear "fender," which made me very happy. Finally, it's starting to look like a motorcycle again instead of a collection of dusty scrap cluttering up my garage :) The best part is, now that I'm starting to see my vision materialize, I'm getting stoked to finish up the project! I want to have it ready to run in...25 days?...something like that, anyway. Last week, I wasn't certain I would make my deadline, but now, I think that maybe I can :)
Wish me luck!
No comments:
Post a Comment